
前言
1、我们都希望自己开发的 App 得到肯定,通常的做法是在应用内预置一个弹窗,在合适的时机弹出,并引导用户去商店评价。
2、App 开发中,应用内更新是必不可少的,国内常见的做法是在 App 中实现下载并安装,但是如果要上架 GooglePlay,这种做法会过不了审核。
接下来我们就使用 GooglePlay 应用内评价和应用内更新实现上面两个需求。
注意: GooglePlay 应用内评价和应用内更新只适用于 GooglePlay 上上架的 App,国内的应用商店并不适用
一、GooglePlay 应用内评价
1.1、设备要求
1、需 5.0 或更高版本的 Android 设备
2、 Android 设备安装了 Google Play 商店
1.2、Play Core 库要求
如需在你的应用中集成 GooglePlay 应用内评价,库版本必须使用 1.8.0:
1
2
3
4
5
6
| dependencies {
implementation 'com.google.android.play:core:1.8.0'
implementation 'com.google.android.play:core-ktx:1.8.0'
}
|
或者更高版本的Play Core 库,目前最新版本如下:
1
2
3
4
5
6
| dependencies {
implementation 'com.google.android.play:review:2.0.1'
implementation 'com.google.android.play:review-ktx:2.0.1'
}
|
1.3、集成 GooglePlay 应用内评价
1.3.1、添加 Gradle 远程依赖
在 app 的 build.gradle 中添加如下依赖:
1
2
3
4
|
implementation 'com.google.android.play:review:2.0.1'
implementation 'com.google.android.play:review-ktx:2.0.1'
|
1.3.2、初始化 GooglePlay 应用内评价
1
2
3
4
5
6
7
8
9
10
11
12
13
14
15
16
17
18
|
fun initInnerReview(){
manager = ReviewManagerFactory.create(MyApplication.getInstance())
val request = manager?.requestReviewFlow()
request?.addOnCompleteListener {
if(it.isSuccessful){
reviewInfo = it.result
Log.d("erdai", "init: get reviewInfo sucess")
}else{
Log.d("erdai", "init: get reviewInfo failed")
}
}
}
|
1.3.3、启动 GooglePlay 应用内评价
1
2
3
4
5
6
7
8
9
10
11
12
13
14
15
16
17
18
|
fun innerReview(activity: Activity){
reviewInfo?.apply {
val flow = manager?.launchReviewFlow(activity, this)
flow?.addOnCompleteListener {
if(it.isSuccessful){
Log.d("erdai", "innerReview: launchReviewFlow success")
}else{
Log.d("erdai", "innerReview: launchReviewFlow failed")
}
}
}
}
|
1.3.4、完整代码
我们可以将 GooglePlay 应用内评价的代码进行封装,放到一个单例里面:
1
2
3
4
5
6
7
8
9
10
11
12
13
14
15
16
17
18
19
20
21
22
23
24
25
26
27
28
29
30
31
32
33
34
35
36
37
38
39
40
41
42
43
44
45
46
47
48
49
50
51
52
53
|
object GooglePlayInnerAppHelper {
var reviewInfo: ReviewInfo? = null
var manager: ReviewManager? = null
fun initInnerReview(){
manager = ReviewManagerFactory.create(MyApplication.getInstance())
val request = manager?.requestReviewFlow()
request?.addOnCompleteListener {
if(it.isSuccessful){
reviewInfo = it.result
Log.d("erdai", "init: get reviewInfo sucess")
}else{
Log.d("erdai", "init: get reviewInfo failed")
}
}
}
fun innerReview(activity: Activity){
reviewInfo?.apply {
val flow = manager?.launchReviewFlow(activity, this)
flow?.addOnCompleteListener {
if(it.isSuccessful){
Log.d("erdai", "innerReview: launchReviewFlow success")
}else{
Log.d("erdai", "innerReview: launchReviewFlow failed")
}
}
}
}
}
|
在合适的时机,以我的为例子:
在 Application 的 onCreate 里面初始化 GooglePlay 应用内评价,然后在项目的首页启动 GooglePlay 应用内评价。
进行调用即可。
1.4、测试
上述集成代码比较简单,主要还是测试比较麻烦,测试的方式有多种,讲下我推荐的一种:
1、将你的应用打包成 .aab 格式的文件上传到 GooglePlay 的 Internal testing(内测)渠道:
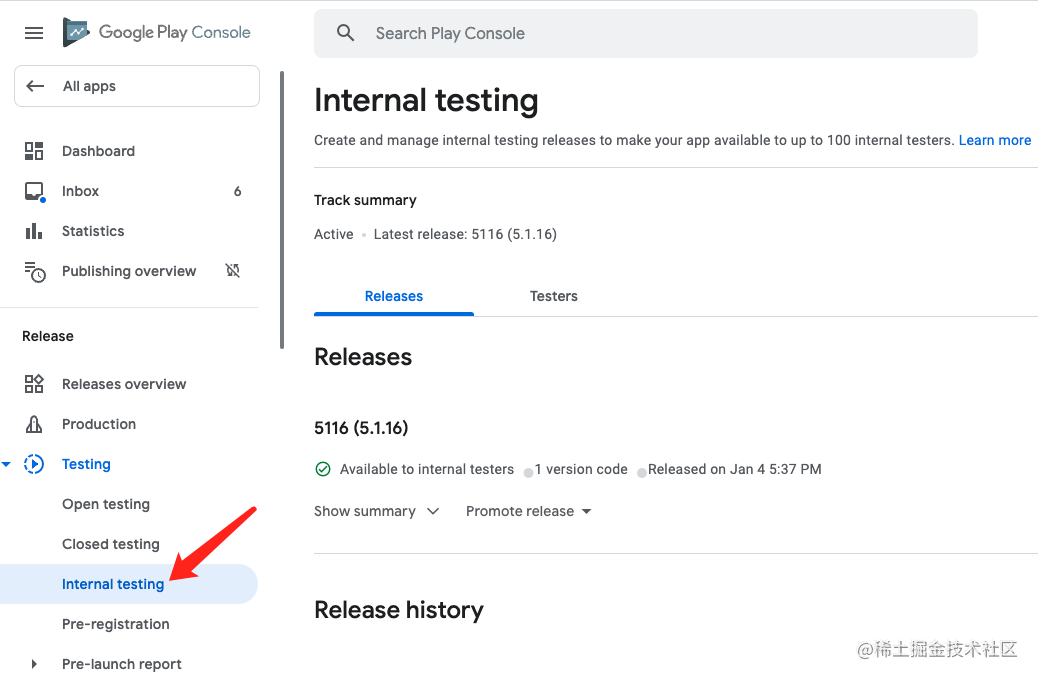
上传到 Internal testing 渠道的好处就是只要你没有进行评价,那么每次都会进行评价弹窗提示。Production(生产)渠道则不会。
2、将你的 GooglePlay 账号加入到内测渠道中,然后从 GooglePlay 商店中下载应用:
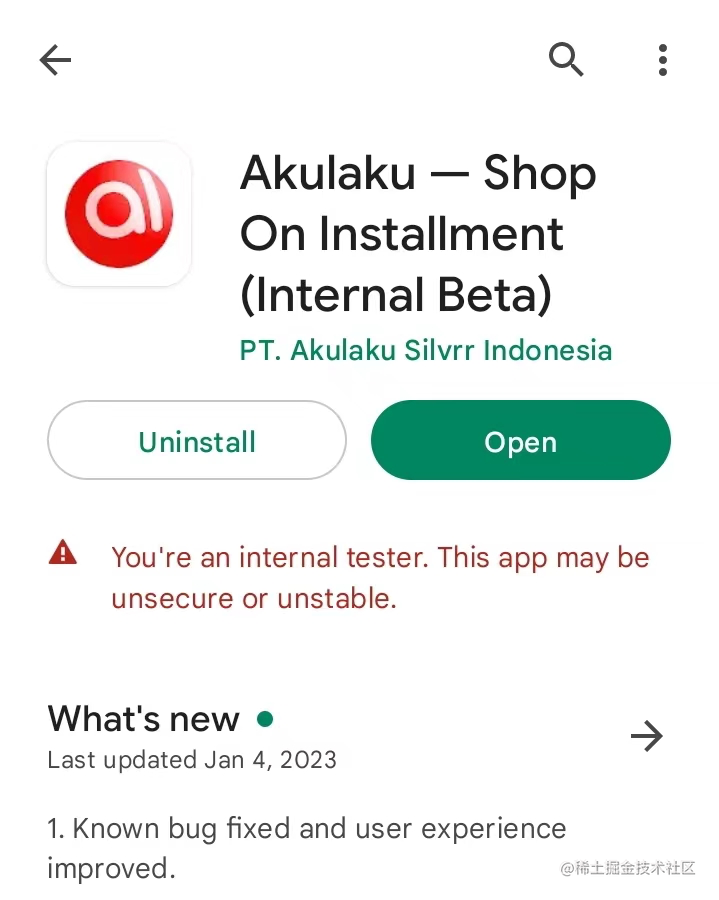
可以看到,GooglePlay 商店会提示你是一个内测账号
注意: 这里不能使用受保护的用户账号(如企业账号),我当时就是使用了企业分配的 GooglePlay 账号导致一直弹不出评价弹窗。需要改用 Gmail 账号,后面使用私人的 Gmail 账号,就成功的弹出了评价弹窗。
3、保证你使用的 GooglePlay 账号没有评价过该应用,如果评价了也弹不出来
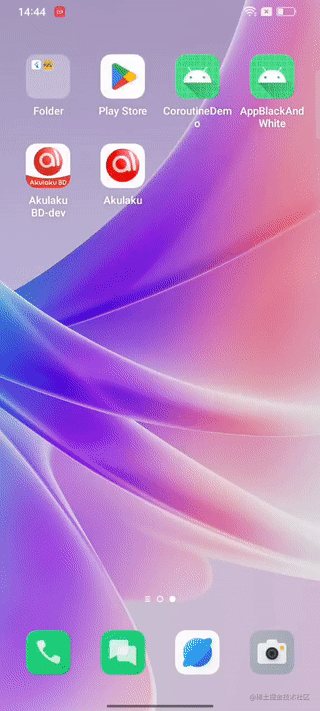
1.5、效果展示
如下图:
二、GooglePlay 应用内更新
2.1、设备要求
1、需 5.0 或更高版本的 Android 设备
2、 Android 设备安装了 Google Play 商店
2.2、Play Core 库要求
如需在你的应用中集成 GooglePlay 应用内评价,库版本必须使用 1.8.0:
1
2
3
4
5
6
| dependencies {
implementation 'com.google.android.play:core:1.8.0'
implementation 'com.google.android.play:core-ktx:1.8.0'
}
|
或者更高版本的Play Core 库,目前最新版本如下:
1
2
3
4
5
6
| dependencies {
implementation 'com.google.android.play:app-update:2.0.1'
implementation 'com.google.android.play:app-update-ktx:2.0.1'
}
|
2.3、集成 GooglePlay 应用内更新
2.3.1、添加 Gradle 远程依赖
在 app 的 build.gradle 中添加如下依赖:
1
2
3
4
|
implementation 'com.google.android.play:app-update:2.0.1'
implementation 'com.google.android.play:app-update-ktx:2.0.1'
|
2.3.2、启动应用内更新
GooglePlay 应用内更新方式有两种:
1、立即更新
2、灵活更新
2.3.2.1、立即更新
立即更新你也可以理解为强制更新,它会打断用户与 app 的交互,弹出一个新的页面提示你升级
代码实现:
1
2
3
4
5
6
7
8
9
10
11
12
13
14
15
16
|
fun innerAppForceUpdate(activity: Activity) {
val appUpdateManager = AppUpdateManagerFactory.create(MyApplication.getInstance())
appUpdateManager.appUpdateInfo.addOnSuccessListener {
if (it.updateAvailability() == UpdateAvailability.UPDATE_AVAILABLE &&
it.isUpdateTypeAllowed(AppUpdateType.IMMEDIATE)) {
appUpdateManager.startUpdateFlowForResult(it,
AppUpdateType.IMMEDIATE,
activity,
UPDATE_REQUEST_CODE)
}
}
}
|
2.3.2.2、灵活更新
灵活更新不会打断用户与 app 的交互,它是在后台静默下载新版本,等下在完了在提示更新
代码实现:
1
2
3
4
5
6
7
8
9
10
11
12
13
14
15
16
17
18
19
20
21
22
23
24
25
26
27
28
29
30
31
32
33
34
|
fun innerAppSmartUpdate(activity: Activity) {
val appUpdateManager = AppUpdateManagerFactory.create(MyApplication.getInstance())
appUpdateManager.appUpdateInfo.addOnSuccessListener {
if (it.updateAvailability() == UpdateAvailability.UPDATE_AVAILABLE &&
it.isUpdateTypeAllowed(AppUpdateType.FLEXIBLE)) {
val installListener = object : InstallStateUpdatedListener {
override fun onStateUpdate(installState: InstallState) {
if(installState.installStatus() == InstallStatus.DOWNLOADING){
val bytesDownloaded = installState.bytesDownloaded()
val totalBytesToDownload = installState.totalBytesToDownload()
} else if (installState.installStatus() == InstallStatus.DOWNLOADED) {
appUpdateManager.unregisterListener(this)
appUpdateManager.completeUpdate()
}
}
}
appUpdateManager.registerListener(installListener)
appUpdateManager.startUpdateFlowForResult(it,
AppUpdateType.FLEXIBLE,
activity,
UPDATE_REQUEST_CODE)
}
}
}
|
2.3.3、完整代码
同样的,我们可以对其进行封装,放到一个单例里面:
1
2
3
4
5
6
7
8
9
10
11
12
13
14
15
16
17
18
19
20
21
22
23
24
25
26
27
28
29
30
31
32
33
34
35
36
37
38
39
40
41
42
43
44
45
46
47
48
49
50
51
52
53
54
55
56
57
58
59
60
|
object GooglePlayInnerAppHelper {
const val UPDATE_REQUEST_CODE: Int = 0x001
fun innerAppForceUpdate(activity: Activity) {
val appUpdateManager = AppUpdateManagerFactory.create(MyApplication.getInstance())
appUpdateManager.appUpdateInfo.addOnSuccessListener {
if (it.updateAvailability() == UpdateAvailability.UPDATE_AVAILABLE && it.isUpdateTypeAllowed(
AppUpdateType.IMMEDIATE)
) {
appUpdateManager.startUpdateFlowForResult(it,
AppUpdateType.IMMEDIATE,
activity,
UPDATE_REQUEST_CODE)
}
}
}
fun innerAppSmartUpdate(activity: Activity) {
val appUpdateManager = AppUpdateManagerFactory.create(MyApplication.getInstance())
appUpdateManager.appUpdateInfo.addOnSuccessListener {
if (it.updateAvailability() == UpdateAvailability.UPDATE_AVAILABLE &&
it.isUpdateTypeAllowed(AppUpdateType.FLEXIBLE)) {
val installListener = object : InstallStateUpdatedListener {
override fun onStateUpdate(installState: InstallState) {
if(installState.installStatus() == InstallStatus.DOWNLOADING){
val bytesDownloaded = installState.bytesDownloaded()
val totalBytesToDownload = installState.totalBytesToDownload()
} else if (installState.installStatus() == InstallStatus.DOWNLOADED) {
appUpdateManager.unregisterListener(this)
appUpdateManager.completeUpdate()
}
}
}
appUpdateManager.registerListener(installListener)
appUpdateManager.startUpdateFlowForResult(it,
AppUpdateType.FLEXIBLE,
activity,
UPDATE_REQUEST_CODE)
}
}
}
}
|
在合适的时机,以我的为例子,立即更新和灵活更新结合使用:
根据后台下发配置,判断是使用立即更新还是灵活更新
2.4、测试
我们需要做以下三步:
1、打包高版本 .aab 格式的文件上传到 GooglePlay 的 Internal testing(内测)渠道,将 GooglePlay 账号,添加到内测渠道
注意: 此时无受保护的用户账号要求,因此这里你可以使用企业账号
2、确保你目前使用的账号至少从 GooglePlay 下载过一次应用,因为只有拥有应用的用户帐号才可以使用应用内更新
3、还原到低版本,使用 AndroidStudio 编译打包即可
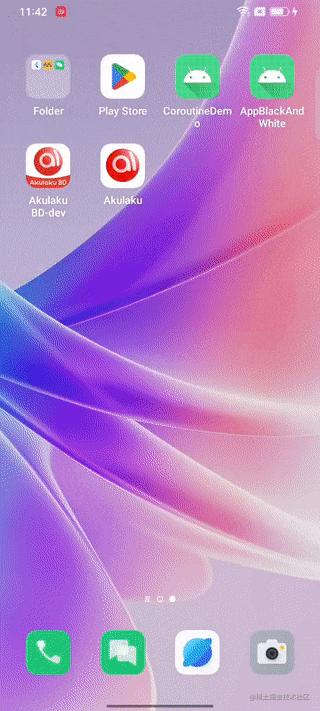
2.5、效果展示
2.5.1、后台下发配置立即更新
如下图:
立即更新给我们新开了一个页面进行下载,等待下载完成会自动给你更新并重启应用。
2.5.2、后台下发配置灵活更新
如下图:
灵活更新会在后台静默下载,等下载完成会自动给你更新并重启应用。
三、总结
本篇文章我们介绍了:
1、GooglePlay 应用内评价
2、GooglePlay 应用内更新
两者集成过程比较简单,主要就是测试效果比较麻烦,按照我文中的步骤,问题不大。
好了,本篇文章到这里就结束了,希望能给你带来帮助 🤝
感谢你阅读这篇文章
参考和推荐
GooglePlay 应用内评价官方文档
GooglePlay 应用内更新官方文档
你的点赞,评论,是对我巨大的鼓励!
欢迎关注我的公众号: sweetying ,文章更新可第一时间收到
如果有问题,公众号内有加我微信的入口,在技术学习、个人成长的道路上,我们一起前进!
