前言 很高兴遇见你~
最近打开各大 App 会发现它们都做了黑白化,如下支付宝的处理:
可以看到应用设置了全局灰色调,表达了一种对逝者的哀悼,非常的应景和人性化。作为程序猿,我们来探索一下它从技术角度是怎么实现的。
一、App 黑白化实现原理 1.1、修改 Canvas 的 Paint 实现黑白化 首先我们应该知道 Android 中能实现黑白化的手段:
正常情况下,App 页面上的 View 都是通过 Canvas + Paint 画出来的。Canvas 对应画布,Paint 对应画笔,两者结合,就能画出 View。
就好比画家画画,如下图:
画一幅画他需要有画布和画笔,通过不同颜色的画笔结合,就画出了一幅惟妙惟肖的画。
到这里你是否受到了一点启发:在 Canvas 上绘制 View 的时候,我们换一支色彩饱和度为 0 的 Paint(画笔),是否就能画出黑白化的 View 呢?
感觉可行,找一下 Paint 相关的 Api ,发现可以对 Paint 进行如下设置:
1 2 3 4 5 6 7 val paint = Paint()val cm = ColorMatrix()0f )
上述代码我们就新建了一支色彩饱和度为 0 的 Paint,接下来使用它去进行 View 的绘制,就能达到黑白化的效果。
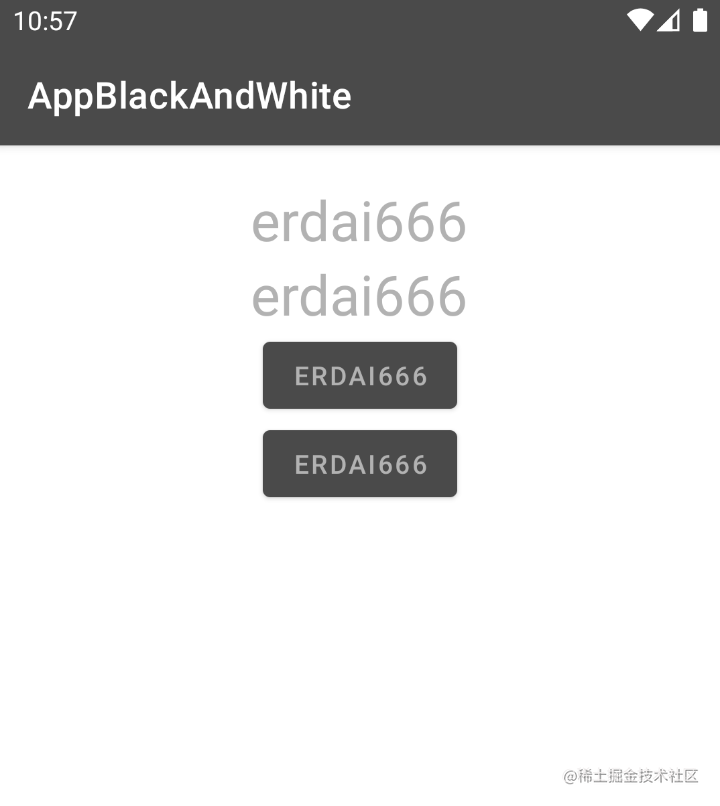
我们进行一个简单的测试:
1、自定义黑白化 TextView 和 Button,代码如下:
1 2 3 4 5 6 7 8 9 10 11 12 13 14 15 16 17 18 19 20 21 22 23 24 25 26 27 28 29 30 31 32 33 34 35 36 37 class GrayTextView (context: Context, attrs: AttributeSet): TextView(context,attrs) {private val paint by lazy {val p = Paint()val cm = ColorMatrix()0f )override fun draw (canvas: Canvas ?) null ,paint, Canvas.ALL_SAVE_FLAG)super .draw(canvas)class GrayButton (context: Context, attrs: AttributeSet): Button(context,attrs) {private val paint by lazy {val p = Paint()val cm = ColorMatrix()0f )override fun draw (canvas: Canvas ?) null ,paint, Canvas.ALL_SAVE_FLAG)super .draw(canvas)
2、修改 activity.main.xml 的布局:
1
2
3
4
5
6
7
8
9
10
11
12
13
14
15
16
17
18
19
20
21
22
23
24
25
26
27
28
29
30
31
32
33
34
35
36
<?xml version="1.0" encoding="utf-8" ?> <LinearLayout xmlns:android ="http://schemas.android.com/apk/res/android" xmlns:tools ="http://schemas.android.com/tools" android:layout_width ="match_parent" android:layout_height ="match_parent" android:gravity ="center_horizontal" android:orientation ="vertical" android:padding ="20dp" tools:context =".MainActivity" > <TextView android:layout_width ="wrap_content" android:layout_height ="wrap_content" android:text ="erdai666" android:textColor ="@android:color/holo_green_light" android:textSize ="30sp" /> <com.dream.appblackandwhite.blackandwhitewidget.GrayTextView android:layout_width ="wrap_content" android:layout_height ="wrap_content" android:text ="erdai666" android:textColor ="@android:color/holo_green_light" android:textSize ="30sp" /> <Button android:layout_width ="wrap_content" android:layout_height ="wrap_content" android:textColor ="@android:color/holo_green_light" android:text ="erdai666" /> <com.dream.appblackandwhite.blackandwhitewidget.GrayButton android:layout_width ="wrap_content" android:layout_height ="wrap_content" android:text ="erdai666" android:textColor ="@android:color/holo_green_light" /> </LinearLayout >
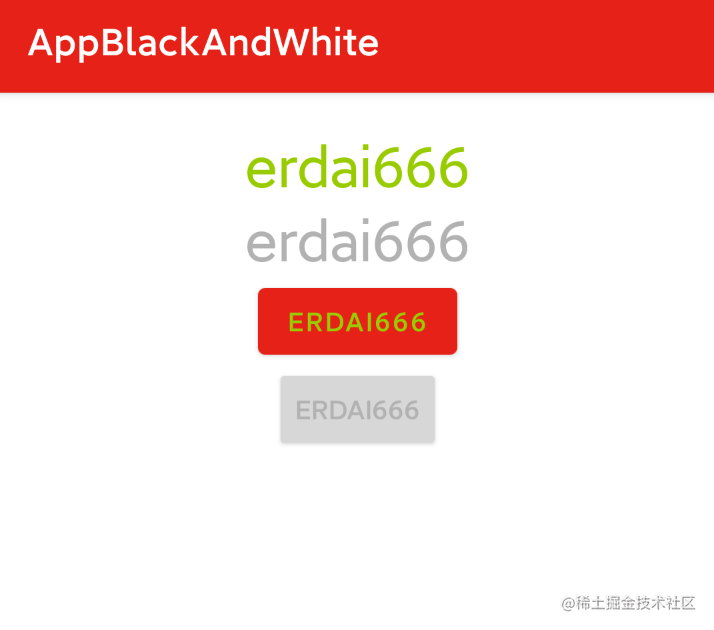
布局很简单,就是和未黑白化的 TextView 和 Button 做对比
3、运行 app ,效果如下图:
这是第一种实现黑白化的方式,接下来介绍另外一种。
1.2、给 View 设置 Paint 实现黑白化 View 有个如下 Api :
这个方法是用来开启离屏缓冲 的,其接收两个参数。
第一个参数接收一个 Int 类型的值,其有三种情况:
1、LAYER_TYPE_NONE:视图正常渲染,不受屏幕外缓冲区支持。这是默认行为。
2、LAYER_TYPE_HARDWARE:如果应用经过硬件加速,视图在硬件中渲染为硬件纹理。如果应用未经过硬件加速,此层类型的行为方式与 LAYER_TYPE_SOFTWARE 相同。
3、LAYER_TYPE_SOFTWARE:使用软件来渲染视图,绘制到 Bitmap,并顺便关闭硬件加速 。
第二个参数接收一个 Paint,也就是画笔,那么我们就可以对画笔做配置,从而达到黑白化的效果。
有了思路,我们先做一个简单的测试:
1、修改 activity.main.xml 的布局:
1
2
3
4
5
6
7
8
9
10
11
12
13
14
15
16
17
18
19
20
21
22
23
24
25
26
27
28
29
30
31
32
33
34
35
36
37
38
<?xml version="1.0" encoding="utf-8" ?> <LinearLayout xmlns:android ="http://schemas.android.com/apk/res/android" xmlns:tools ="http://schemas.android.com/tools" android:layout_width ="match_parent" android:layout_height ="match_parent" android:gravity ="center_horizontal" android:orientation ="vertical" android:padding ="20dp" tools:context =".MainActivity" > <TextView android:layout_width ="wrap_content" android:layout_height ="wrap_content" android:text ="erdai666" android:textColor ="@android:color/holo_green_light" android:textSize ="30sp" /> <TextView android:id ="@+id/tvBlackAndWhite" android:layout_width ="wrap_content" android:layout_height ="wrap_content" android:text ="erdai666" android:textColor ="@android:color/holo_green_light" android:textSize ="30sp" /> <Button android:id ="@+id/btnBlackAndWhite" android:layout_width ="wrap_content" android:layout_height ="wrap_content" android:textColor ="@android:color/holo_green_light" android:text ="erdai666" /> <Button android:layout_width ="wrap_content" android:layout_height ="wrap_content" android:text ="erdai666" android:textColor ="@android:color/holo_green_light" /> </LinearLayout >
上述布局很简单,就是给要黑白化的 TextView ,Button 加了一个 id,方便我们在 Activity 里面操作
2、修改 MainActivity:
1
2
3
4
5
6
7
8
9
10
11
12
13
14
15
16
17
18
19
20
21
22
23
24
25
26
27
28
29
30
31
class MainActivity : AppCompatActivity () {private val paint by lazy {val p = Paint()val cm = ColorMatrix()0f )private val tvBlackAndWhite by lazy {private val btnBlackAndWhite by lazy {override fun onCreate (savedInstanceState: Bundle ?) super .onCreate(savedInstanceState)
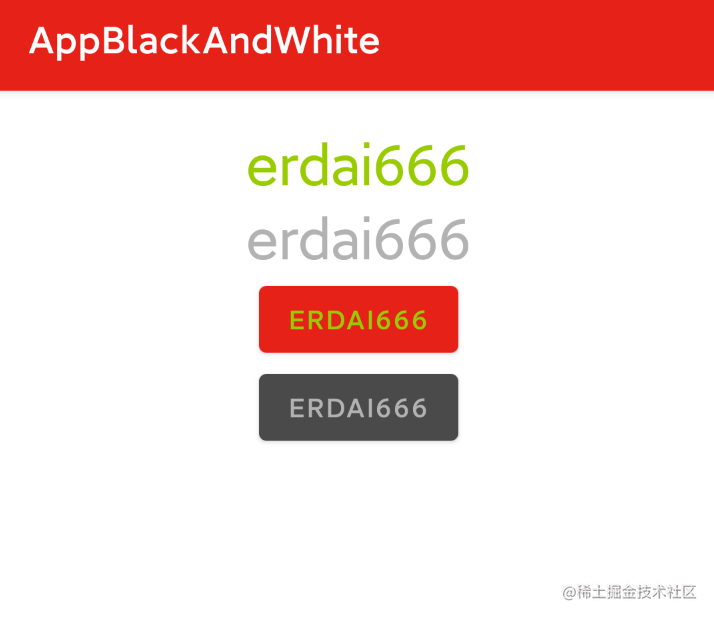
3、运行 app ,效果展示:
了解了 App 黑白化的原理,接下来我们就来实现 App 真正的黑白化
二、App 黑白化方案实践 上述我们都是对单个 View 进行黑白化处理,那有没有什么办法,让整个页面都变成黑白化的呢?
答:有的,我们可以找到当前 View 树一个合适的父 View,对他进行黑白化设置或者替换为自定义黑白化 View,因为父 View 的 Canvas 和 Paint 是往下分发的,所以它所包含的子 View 都会黑白化处理 ,这样我们就可以实现 App 黑白化
但是我有一些疑问:哪个父 View 是最合适的呢?具体如何实现呢?
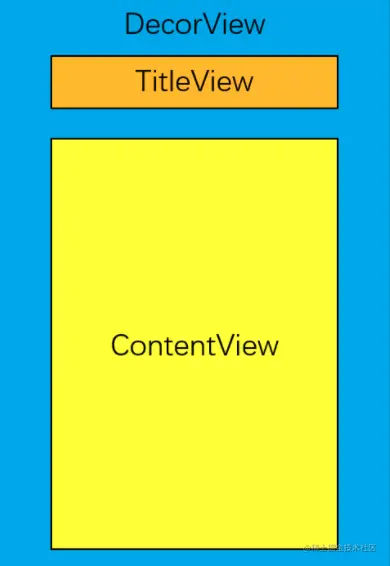
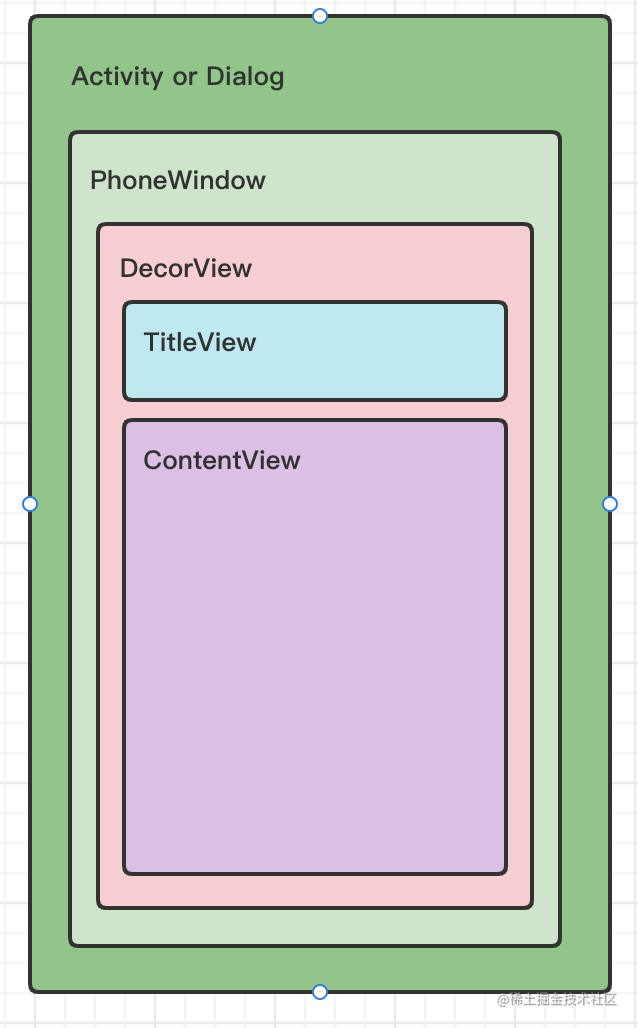
带着上面的疑问,我们看下下面这张图:
每个页面中有一个顶级 View 叫 DecorView,DecorView 中包含一个竖直方向的 LinearLayout,LinearLayout 由两部分组成,第一部分是标题栏,第二部分是内容栏,内容栏是一个 FrameLayout,我们在 Activity 中调用 setContentView 就是将 View 添加到这个 FrameLayout 中。
了解了上面的内容,你心中是否有了实现方案了呢?
1、是不是可以拿到页面对应的 DecorView ,对其进行黑白化设置
2、是不是可以把内容栏(FrameLayout)替换为自定义的 FrameLayout(黑白化的 FrameLayout)
上述两种方案都是可行的
2.1、方案一:对 DecorView 进行黑白化设置 想要拿到一个页面的 DecorView 有很多方式,主要介绍两种:
1、直接在 Activity 中通过 Window 获取 DecorView
1 window.decorView.setLayerType(View.LAYER_TYPE_HARDWARE,paint)
Tips: 建议创建一个 Activity 的基类 BaseActivity,在 BaseActivity 里面处理,这样所有继承 BaseActivity 的都会生效
那万一我有些 Activity 没有继承呢?那你接着往下看😂
2、在 Application 中注册 registerActivityLifecycleCallbacks 回调,回调中通过 activity 实例同样可以拿到 DecorView
1 2 3 4 5 6 7 8 9 10 11 12 13 14 15 16 17 18 19 20 21 22 23 24 registerActivityLifecycleCallbacks(object : ActivityLifecycleCallbacks {override fun onActivityCreated (activity: Activity , savedInstanceState: Bundle ?) val decorView = activity.window.decorViewoverride fun onActivityStarted (activity: Activity ) override fun onActivityResumed (activity: Activity ) override fun onActivityPaused (activity: Activity ) override fun onActivityStopped (activity: Activity ) override fun onActivitySaveInstanceState (activity: Activity , outState: Bundle ) override fun onActivityDestroyed (activity: Activity )
这种方式所有的 Activity 都会生效。
看一眼效果:
可以看到,整个页面都黑白化了。
大家可以思考一下这种方案有什么不足之处?后面在讲
2.2、方案二:替换内容栏 FrameLayout 为黑白化 FrameLayout 怎么替换?
这个你就需要对 LayoutInflater 的 inflate 过程有一定的了解,如下方法截图:
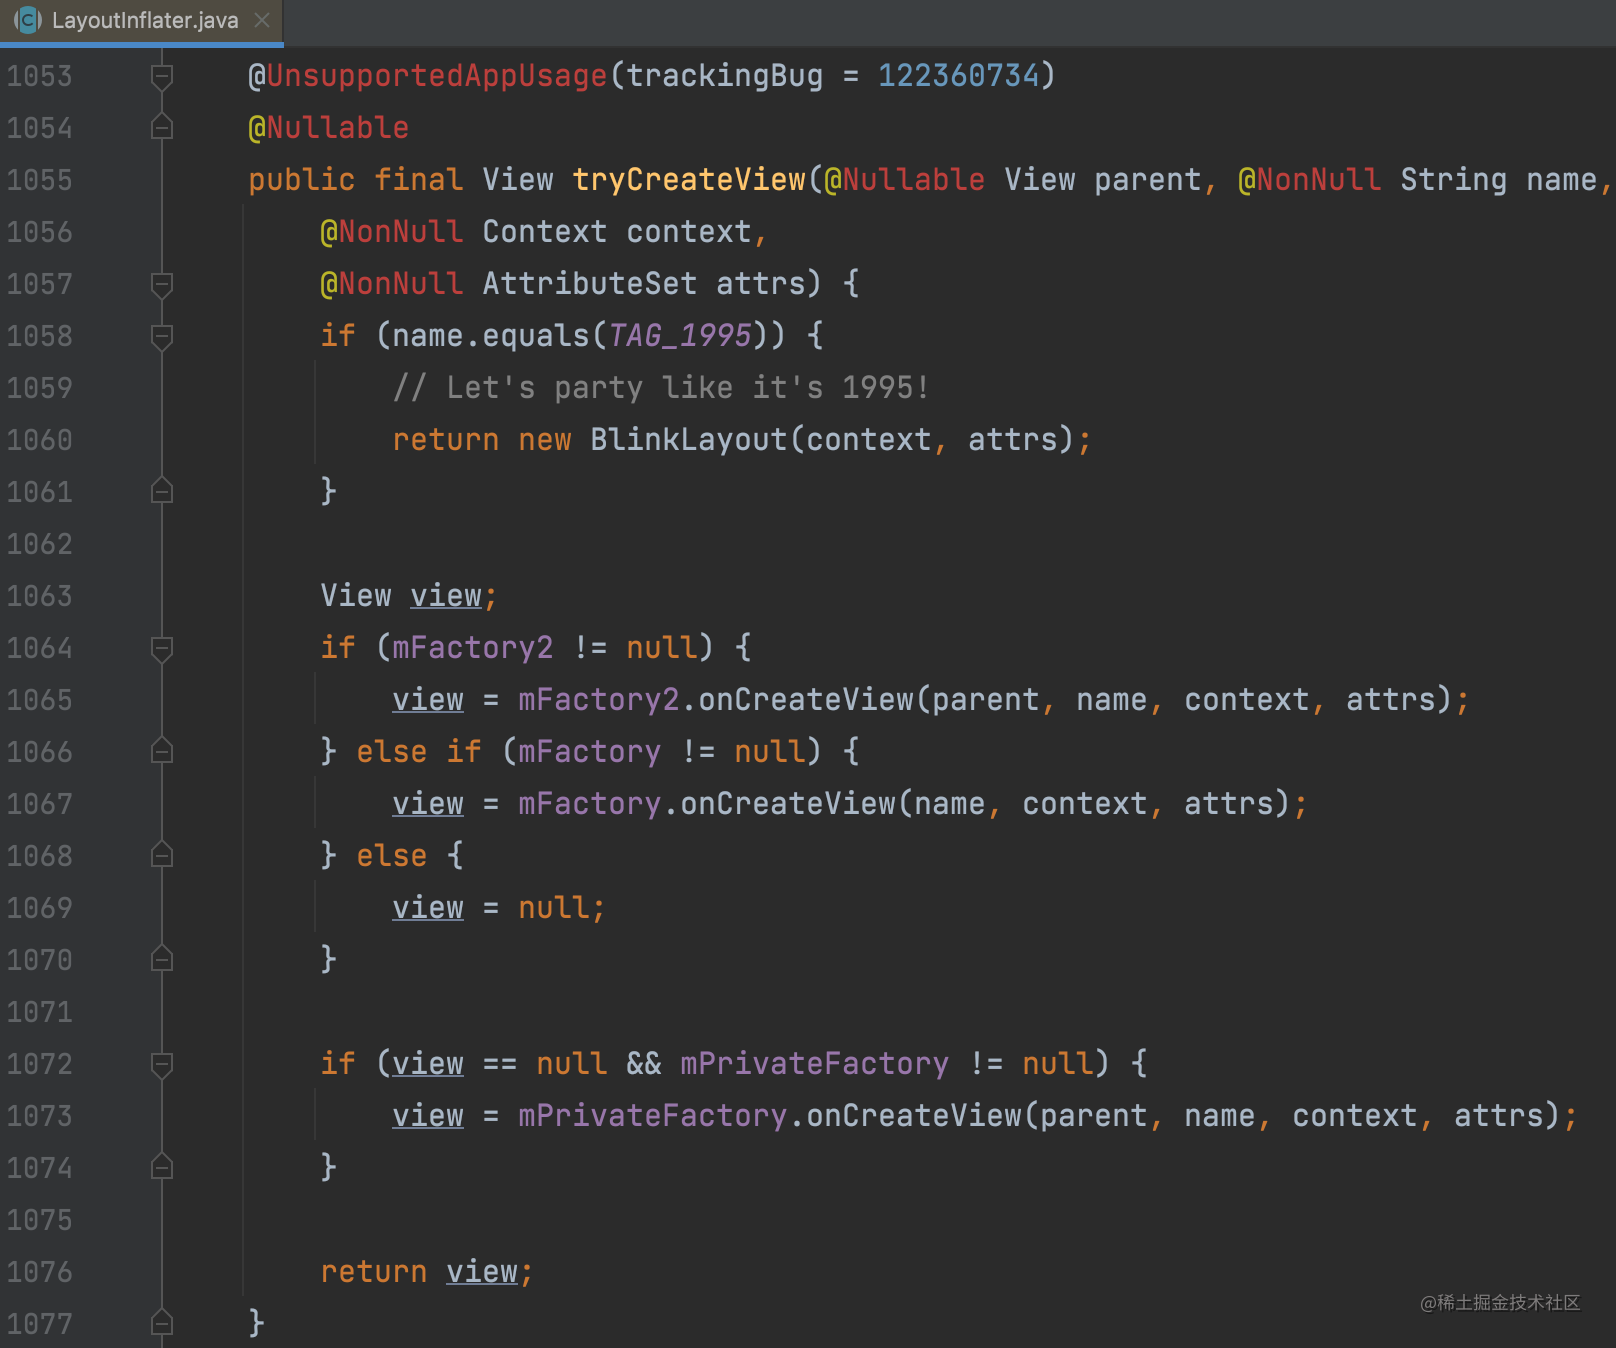
可以看到,LayoutInflater 在创建 View 的过程中:
1、优先使用 mFactory2 去创建 View ,如果 mFactory2 为空则使用 mFactory,mFactory 为空才会使用 mPrivateFactory
2、Activity 中,系统给我们设置了 mFactory2:
实际流程跟下去最终就是想做如下处理:
将一些系统的 View 替换为:androidx.appcompat.widget 下的 View,如:TextView -> AppCompatTextView ,ImageView -> AppCompatImageView。
3、Activity 可以复写 onCreateView 方法,这个方法其实也是 LayoutFactory 在构建 View 的时候回调出来的,一般对应其内部的 mPrivateFactory。
4、目前系统对于 FrameLayout 并没有特殊处理,Activity 可以复写 onCreateView 方法,然后将内容栏 FrameLayout 替换为黑白化 FrameLayout 即可。
了解了替换思路,接下来我们实践一下。
1、创建 BaseActivity ,将替换逻辑写在基类里面:
1
2
3
4
5
6
7
8
9
10
11
12
13
14
15
16
17
18
19
20
21
22
23
24
25
26
27
28
29
30
31
32
33
34
35
36
37
38
39
40
41
42
43
44
45
46
47
abstract class BaseActivity : AppCompatActivity () {override fun onCreate (savedInstanceState: Bundle ?) super .onCreate(savedInstanceState)abstract fun getLayoutId () Int abstract fun initView () override fun onCreateView ( parent: View ?, name: String , context: Context , attrs: AttributeSet ) try {if ("FrameLayout" == name) {val attributeCount = attrs.attributeCountfor (i in 0 until attributeCount) {val attributeName = attrs.getAttributeName(i)val attributeValue = attrs.getAttributeValue(i)if ("id" == attributeName) {val resId = Integer.parseInt(attributeValue.substring(1 ))val idValue = resources.getResourceName(resId)if ("android:id/content" == idValue) {val grayFrameLayout = GrayFrameLayout(context, attrs)return grayFrameLayoutcatch (e: Exception) {return super .onCreateView(parent, name, context, attrs)
在看一眼 GrayFrameLayout:
1
2
3
4
5
6
7
8
9
10
11
12
13
14
15
16
17
18
19
20
21
22
23
24
25
class GrayFrameLayout (context: Context, attrs: AttributeSet): FrameLayout(context,attrs) {private val paint by lazy {val p = Paint()val cm = ColorMatrix()0f )override fun draw (canvas: Canvas ?) null ,paint,Canvas.ALL_SAVE_FLAG)super .draw(canvas)override fun dispatchDraw (canvas: Canvas ?) null ,paint,Canvas.ALL_SAVE_FLAG)super .dispatchDraw(canvas)
2、修改一下 MainActivity
1
2
3
4
5
6
7
8
9
10
class MainActivity : BaseActivity () {override fun getLayoutId () Int {return R.layout.activity_mainoverride fun initView ()
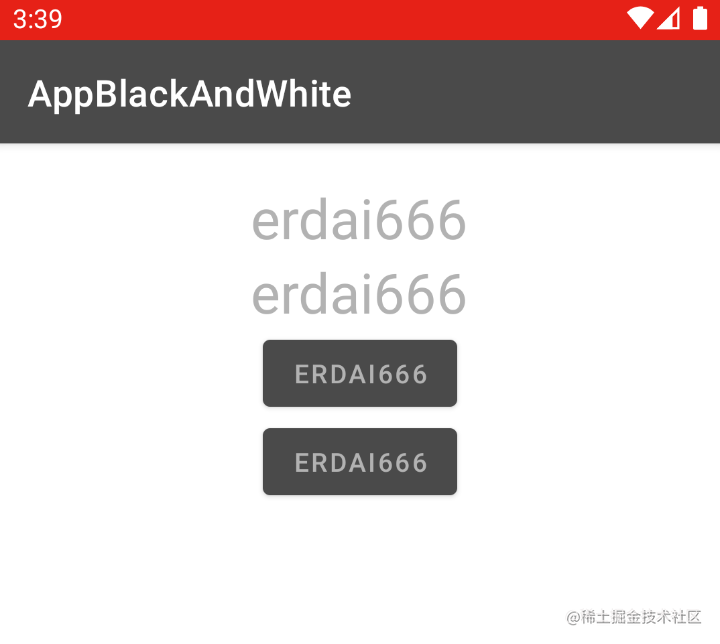
3、最后运行 App ,看一眼效果:
状态栏颜色没变,🤔,手动设置状态栏颜色和标题栏颜色保持一致
吸取标题栏颜色值:#4A4A4A ,在 BaseActivity 里面设置一下:
1
2
3
4
5
6
7
8
9
10
11
12
13
14
abstract class BaseActivity : AppCompatActivity () {override fun onCreate (savedInstanceState: Bundle ?) super .onCreate(savedInstanceState)if (Build.VERSION.SDK_INT >= Build.VERSION_CODES.LOLLIPOP) {"#4A4A4A" )
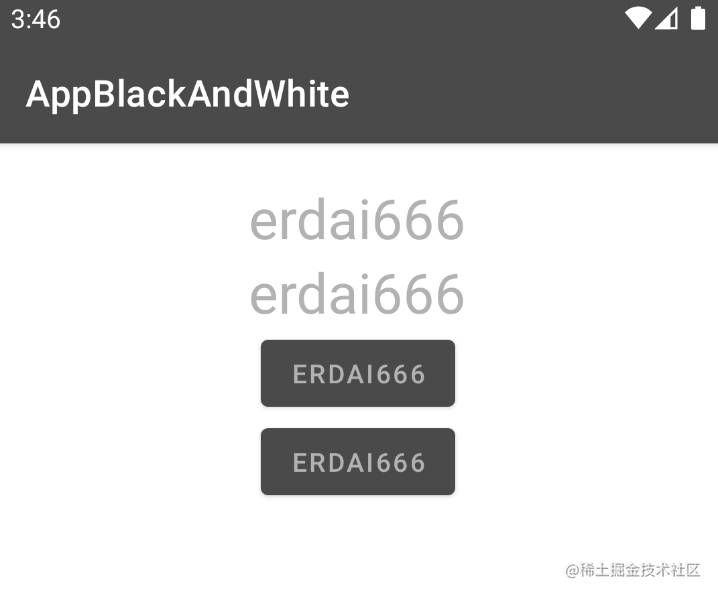
运行 App,在看一眼效果:
ok,现在整个页面都黑白化了,🍺。
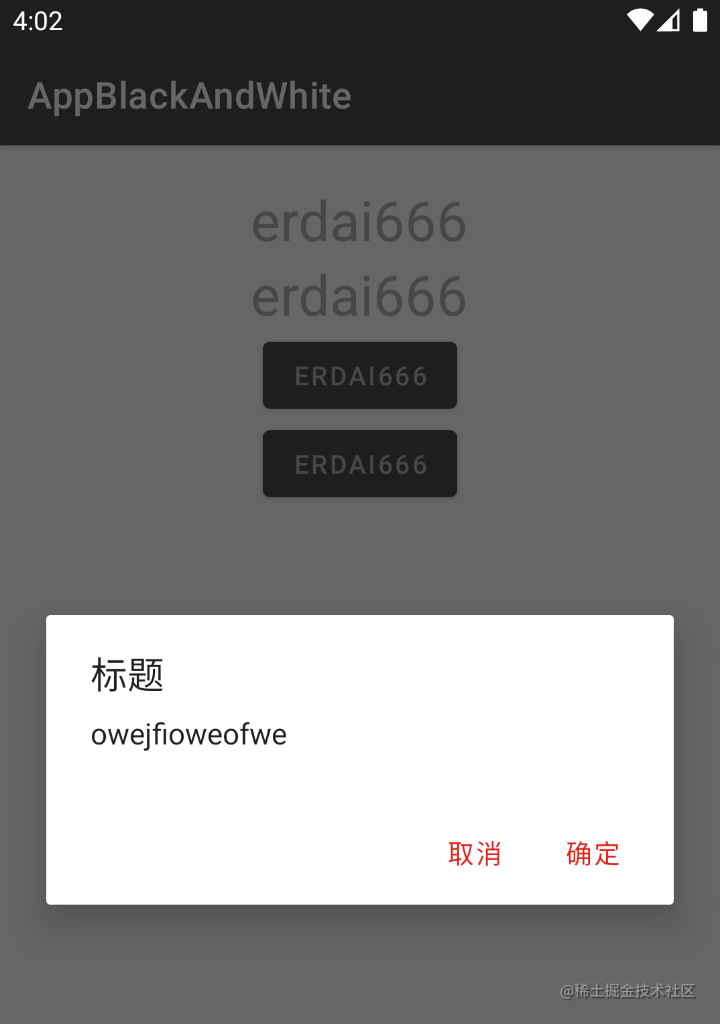
三、问题 3.1、方案一问题 接下来我们看看方案一存在的不足之处,我们在第一个 Button 按钮添加点击事件,让它弹出一个 Dialog:
1 2 3 4 5 6 7 8 9 10 11 12 13 14 15 16 17 18 19 20 21 "wrap_content" "wrap_content" "btnClick" "erdai666" "@android:color/holo_green_light" />fun btnClick (view: View ) this )"标题" )"owejfioweofwe" )"确定" ){dialog,which->"取消" ){dialog,which->
效果展示:
Dialog 并未黑白化,为啥呢?先记着
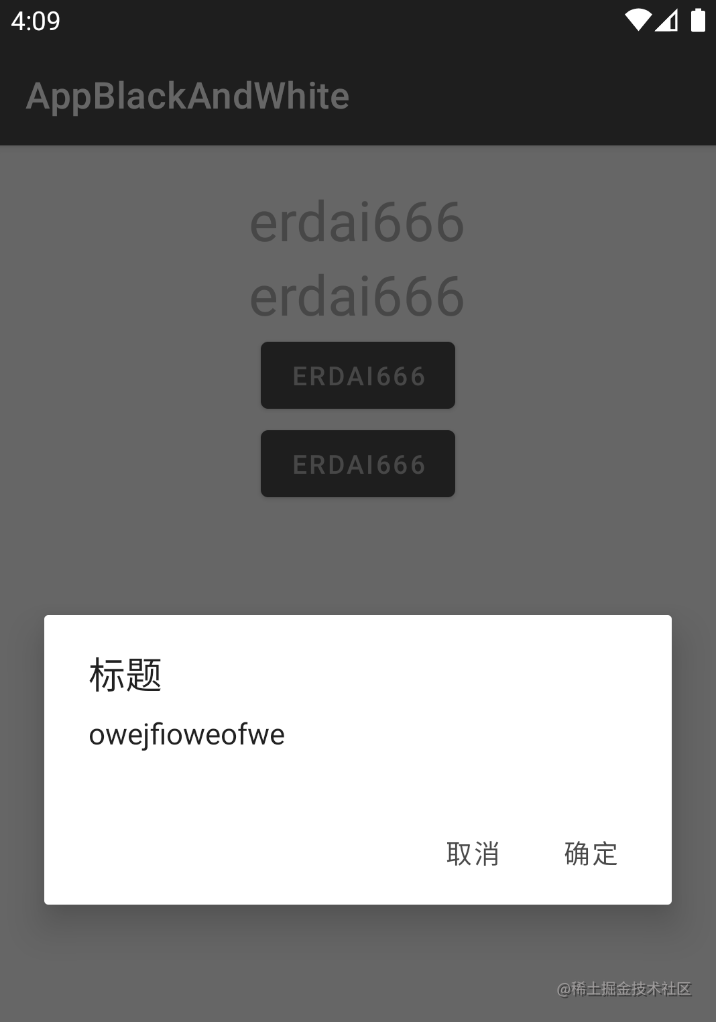
3.2、方案二问题 把上述代码放在方案二跑一遍,你会发现 Dialog 黑白化了,如下图:
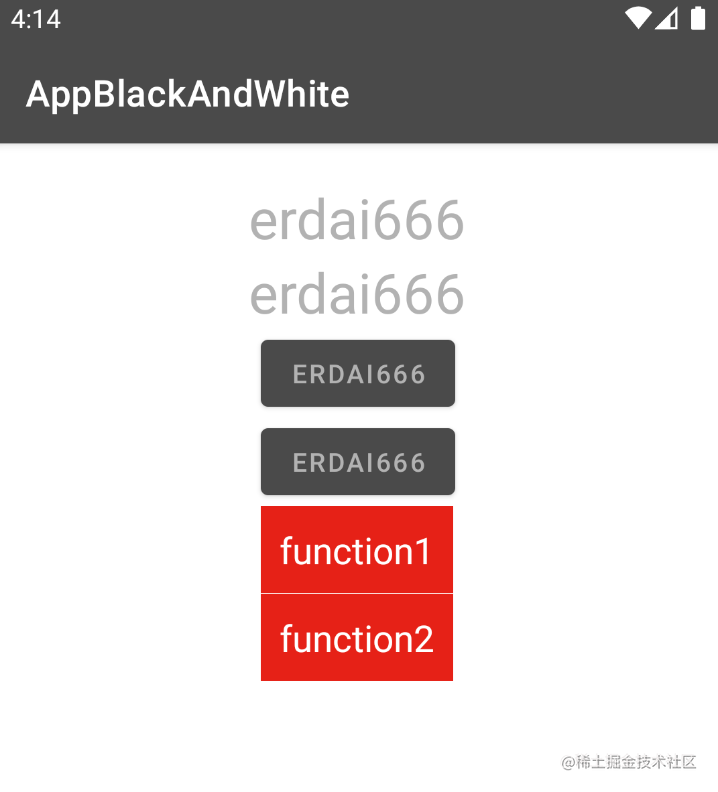
但是如果我们换成 PopupWindow:
1 2 3 4 5 6 7 8 9 10 11 12 13 14 15 16 17 18 19 20 21 22 23 24 25 26 27 28 29 30 31 32 33 34 35 36 37 38 39 40 41 42 43 44 45 46 47 48 49 50 51 52 53 54 55 56 57 58 59 60 61 "@+id/btnBlackAndWhite" "wrap_content" "wrap_content" "btnClick1" "erdai666" "@android:color/holo_green_light" />"1.0" encoding="utf-8" ?>"http://schemas.android.com/apk/res/android" "wrap_content" "wrap_content" >"wrap_content" "wrap_content" "@color/color_E62117" "vertical" >"wrap_content" "wrap_content" "center" "10dp" "function1" "@color/white" "20sp" />"match_parent" "0.5dp" "@color/white" />"wrap_content" "wrap_content" "center" "10dp" "function2" "@color/white" "20sp" />fun btnClick1 (view: View ) val contentView = layoutInflater.inflate(R.layout.popup_window_view,null )val popupWindow = PopupWindow(true true true
效果展示:
PopupWindow 没有黑白化。
梳理一下方案一和方案二的问题:
1、方案一:Dialog,PopupWindow 都未黑白化
2、方案二:Dialog 黑白化,PopupWindow 未黑白化
小朋友,你是不是有很多问号?为啥呢?
想了解这些问题,我们首先得对 Android 的 Window 机制,Dialog 源码,PopupWindow 源码有一定的了解,推荐一篇文章:Android全面解析之Window机制 ,这里就不展开讲了
方案一之所以 Dialog,PopupWindow 都未黑白化,是因为 Activity,Dialog,PopupWindow 它们拥有不同的 DecorView ,你设置 Activity 的 DecorView,当然不会影响 Dialog,PopupWindow
方案二之所以 Dialog 黑白化,PopupWindow 未黑白化,是因为 Dialog 和 Activity 拥有相同的 View 结构,如下图:
Dialog 创建了新的 PhoneWindow,使用了 PhoneWindow 的 DecorView 模板。而 PopupWindow 并没有。
两种方案都不行,问题到了这里似乎无解了,真的无解了吗?
3.2、新思路 想一下,Activity,Dialog,PopupWindow 或其他一些 Window 组件它们是不是都要进行 Window 的添加, Window 的添加最终会走到如下方法:
1 2 3 4 5 6 7 8 9 10 11 12 13 14 15 16 public void addView (View view, ViewGroup.LayoutParams params, Display display, Window parentWindow) {synchronized (mLock) {try {
Tips:
Window 是 View 树的载体,View 树是 Window 的具体表现形式,View 树可以是一个单独的 View,也可以是很多 View 组合。
就好比一个班级,班级是学生的载体,学生是班级的具体体现
WindowManagerGlobal 是一个全局单例,其中 mViews 是一个集合,App 中所有的 Window 在添加的时候都会被它给存起来。
那我们是不是可以 Hook 拿到 mViews 中所有的 View 然后对他们进行黑白化设置,这样是不是所有的页面都变成黑白化了呢?
限于篇幅,我打算在写一篇文章去对新思路进行实践,
四、总结 本篇文章我们介绍了:
1、App 黑白化实现原理:将 Paint 的饱和度设置为 0,然后进行 View 的绘制
2、App 黑白化两种方案实践:
1、对页面的 DecorView 进行黑白化设置
2、替换页面的内容栏 FramLaout 为黑白化 FrameLayout
3、分析了 App 黑白化两种方案存在的一些问题
1、方案一:Dialog,PopupWindow 黑白化不生效
2、方案二:Dialog 黑白化生效,PopupWindow 黑白化不生效
4、给出了 App 黑白化两种方案出现问题的原因以及新的思路
关于新思路实践,预知后事如何,且听下回分解。
好了,本篇文章到这里就结束了,希望能给你带来帮助 🤝
感谢你阅读这篇文章
参考和推荐 App 黑白化实现探索,有一行代码实现的方案吗?
Android全面解析之Window机制
App全局灰度化实践-GlobalGray
你的点赞,评论,是对我巨大的鼓励!
欢迎关注我的公众号: sweetying
如果有问题 ,公众号内有加我微信的入口,在技术学习、个人成长的道路上,我们一起前进!
