一篇就够系列:Android 中使用 Protobuf

前言

很高兴遇见你~

最近我负责的 LiveChat 客服聊天系统到了自研阶段,类似做一个腾讯 IM 通信 SDK。和后台讨论后,确定数据传输方式使用 Protobuf,简单的介绍下自己的一个使用心得

一、Protobuf 介绍

Protobuf 全称:Protocol Buffers,是 Google 推出的一种与平台无关、语言无关、可扩展的轻便高效的序列化数据存储格式,类似于我们常用的 xml 和 json。

问题:既然有了 xml 和 json,Google 为啥还要推出 Protobuf 呢?

存在是有原因的,Protobuf 用两个字总结:小,快。用 Protobuf 序列化后的大小是 json 的十分之一,是 xml 格式的二十分之一,而且性能是他们的 5~100 倍。

通常情况下,我们使用 xml 或者 json 进行数据通信是没什么问题的,但是在高性能和大数据通信的情况下,如果有办法压缩数据量,提高传输效率,显然会给用户带来更快更流畅的体验,因此做 LiveChat 自研,Protobuf 成为我们进行数据传输的第一选择。

xml json protobuf
数据保存方式 文本 文本 二进制
数据保存大小 一般
解析效率 一般

二、Protobuf 环境配置

介绍两种安装 Protobuf 的方式:

1、Github 下载 Protobuf 并安装

2、brew 安装

2.1、方式一:Github 下载 Protobuf 并安装

注意:Protobuf 版本尽量保持前后台一致,这里是后台和我约定的一个版本

Protobuf Github 下载地址:https://github.com/protocolbuffers/protobuf/releases/tag/v3.19.2

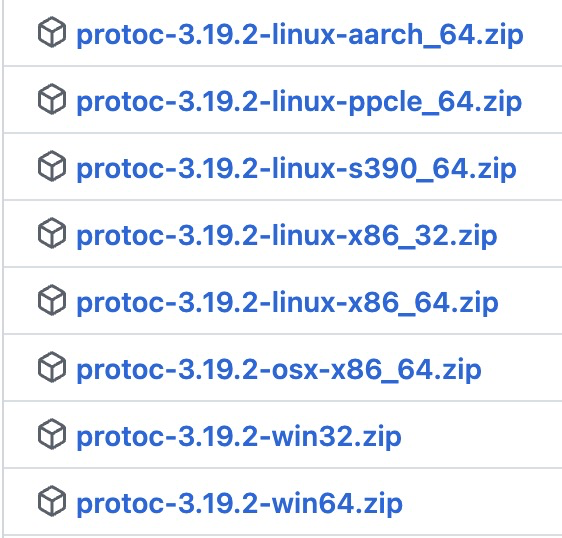
1、根据自己的系统选择相应的 zip 包:

image-20220823172254077

2、解压并配置环境变量

以我下载的为例,解压后结构如下:

image-20220823172812299

可以看到 bin 目录下有个 protoc 的可执行文件,我们给它配置一下环境变量就可以使用了,以我的为例:

1
2
3
# protobuf 环境变量
export PROTOBUF_HOME=/Users/zhouying/Downloads/protoc-3.19.2-osx-x86_64
export PATH=${PATH}:${PROTOBUF_HOME}/bin

3、配置好后,使用 protoc –version 验证

打开终端键入 protoc –version 命令:

image-20220823174015288

可以看到打印出了版本,证明我们安装成功了

2.2、方式二:brew 安装

直接使用以下命令就可以一键安装或卸载:

1
2
3
4
5
//一键安装 protobuf
brew install protobuf

//一键卸载 protobuf
brew uninstall protobuf

注意:这种方式只适用于 Mac 系统,而且安装的 protobuf 为最新版本,因此如果想要使用指定的版本,建议使用方式一

三、使用 IDE 创建 Protobuf 文件

注意:这里我使用的 IDE 是 AndroidStudio

1、创建一个以 .proto 为后缀的文件,如下图:

image-20220823192237038

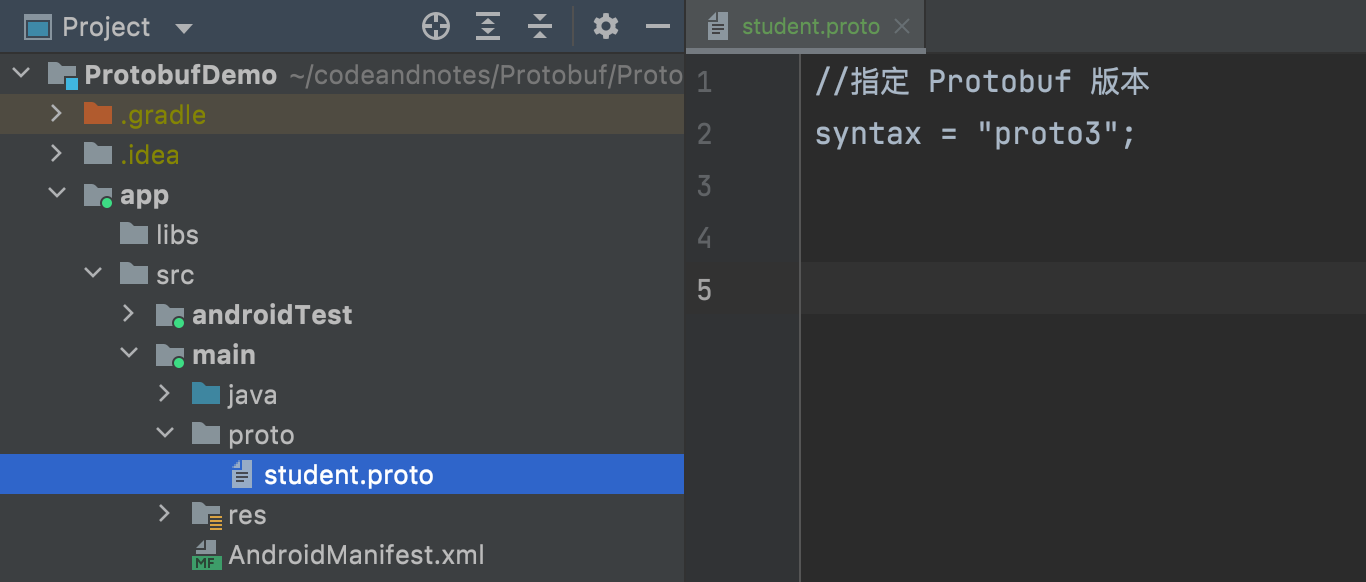
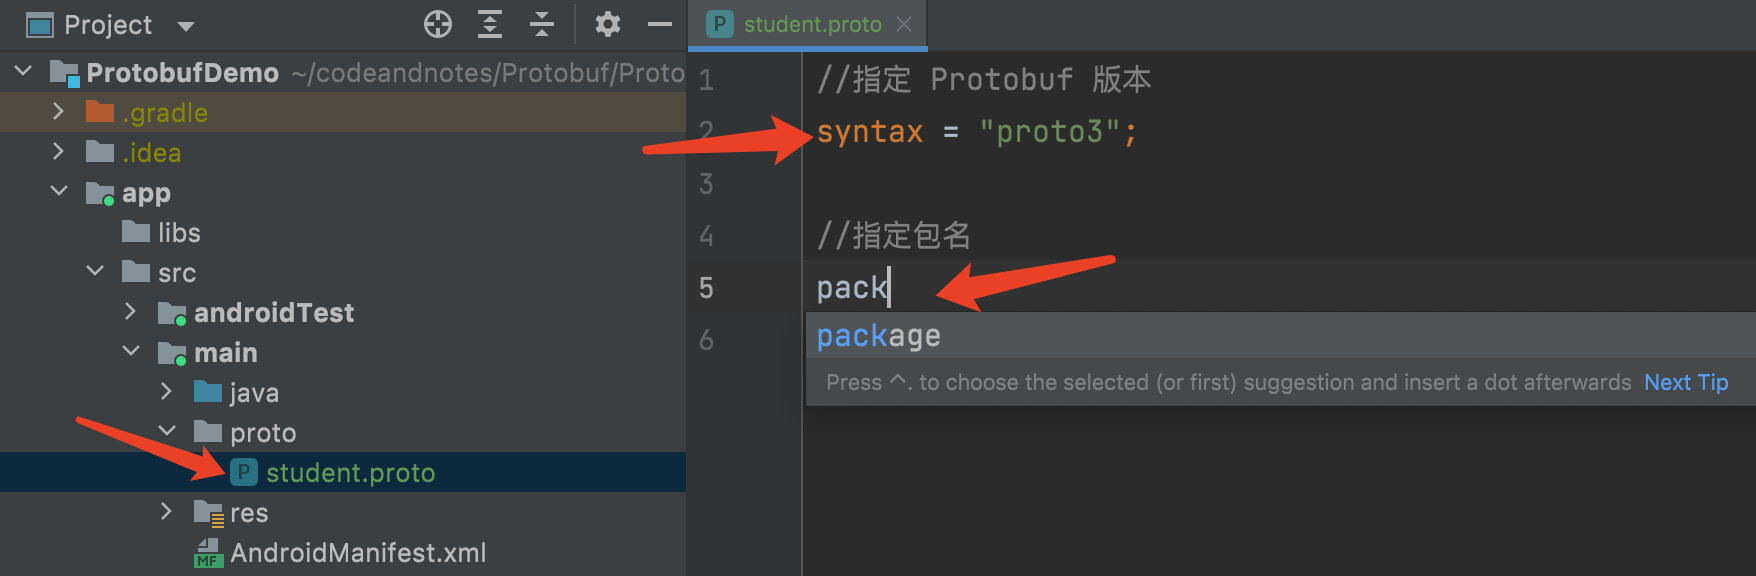
可以看到这个文件前面的 icon 是个文本类型的,而且你在编写代码时,没有任何提示,关键字也没高亮显示,此时我们需要集成一个插件来支持 Protobuf 的编写

2、集成 Protocol Buffers 插件

image-20220823192414258

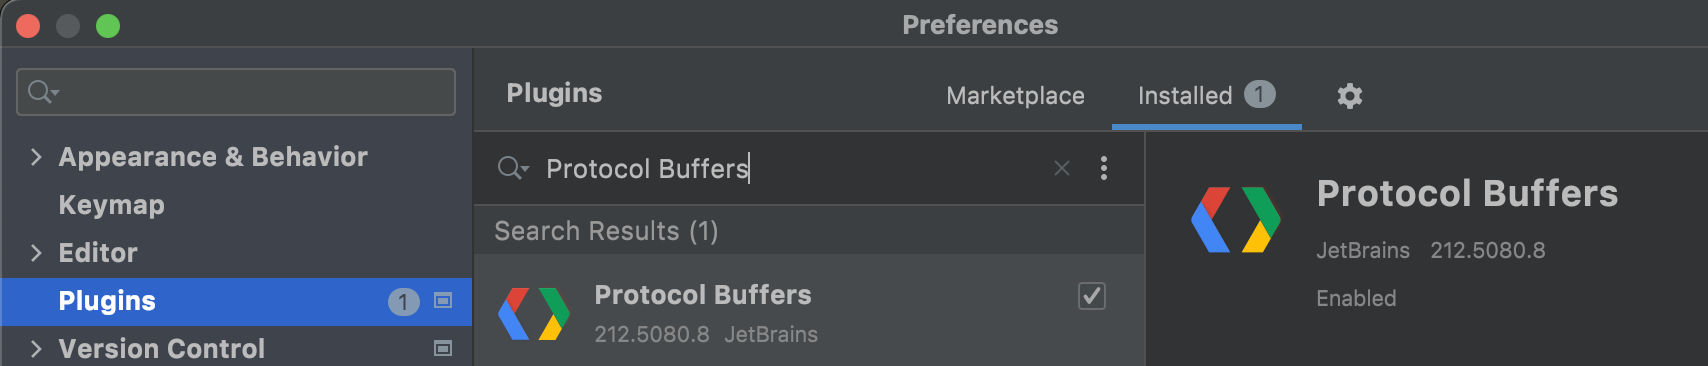
当我们集成这个插件后,可以看到文件 icon 和代码高亮的变化,而且还会有语法提示

image-20220823192636386

ok,接下来我们就可以愉快的编写 Protobuf 了,但是要怎么写呢😂 ?你是不是还不会 Protobuf 的语法,接着往下看

四、Protobuf 语法基础

关于 Protobuf 的语法有很多,我们讲一些常用的

4.1、Protobuf 常用关键字介绍

关键字 说明
syntax 指定 Protobuf 的版本,Protobuf 目前有 proto2 和 proto3 两个常用版本,如果没有声明,则默认是proto2
package 指定文件包名
import 导包,和 Java 的 import 类似
message 定义消息类,和 Java 的 class 关键字类似,消息类之间可以嵌套
repeated 定义一个集合,和 Java 的集合类似
reserved 保留字段,如果使用了这个关键字修饰,用户就不能使用这个字段编号或字段名
option option 可以用在 Protobuf 的 scope 中,或者 message、enum、service 的定义中,Protobuf 定义的 option 有 java_package,java_outer_classname,java_multiple_files 等等
optional 表示该字段是可选的
java_package 指定生成类所在的包名,需配合
java_outer_classname 定义当前文件的类名,如果没有定义,则默认为文件的首字母大写名称
java_multiple_files 指定编译过后 Java 的文件个数,如果是 true,那么将会一个 Java 对象一个类,如果是 false,那么定义的Java 对象将会被包含在同一个文件中

注意:在 Proto3 中不支持 required (必须)字段

4.2、Protobuf 基本数据类型

Protobuf Type 说明 对应 Java/Kotlin Type
double 固定 8 字节长度 double
float 固定 4 字节长度 float
int32 可变长度编码,对负数编码低效,如果字段可能为负数,用 sint32 代替 int
int64 可变长度编码,对负数编码低效,如果字段可能为负数,用 sint64 代替 long
uint32 可变长度编码,无符号整数 int
uint64 可变长度编码,无符号整数 long
sint32 可变长度编码,有符号整数 int
sint64 可变长度编码,有符号整数 long
fixed32 固定 4 字节长度,无符号整数 int
fixed64 固定 8 字节长度,无符号整数 long
sfixed32 固定 4 字节长度,有符号整数 int
sfixed64 固定 8 字节长度,有符号整数 long
bool 布尔类型,值为 true 或 false boolean
string 字符串类型 String

可变长度编码和固定长度编码区别:

1
2
3
4
5
6
7
//例如说我在 Java 里面进行如下定义:
int a = 1;
//因为 int 类型占 4 个字节,1个字节占 8 位,我们把 1 的字节占位给列出来:
00000000 00000000 00000000 00000001
//可以看到 1 的前面 3 个字节占位都是 0,在 Protobuf 里面是可以去掉的,于是就变成了:
00000001
//因此 1 在 Protobuf 里面就只占用了一个字节,节省了空间

上面这种就是可变长度编码。而固定长度编码就是即使前面的字节占位是 0,也不能去掉,我就是要占这么多字节

4.2.1、基本数据类型默认值

类型 默认值
数值类型 0
bool false
string 空字符串
enum 默认为第一个元素

4.3、消息类型定义

在上面创建的 Protobuf 文件中,定义一个学生,学生有姓名,年龄,邮箱和课程,我们来实现一下它:

1
2
3
4
5
6
7
8
9
10
11
12
13
14
15
16
17
//指定 Protobuf 版本
syntax = "proto3";

//指定包名
package erdai;

//定义一个学生的消息类
message Student{
//姓名
string name = 1;
//年龄
int32 age = 2;
//邮箱
string email = 3;
//课程
repeated string course = 4; //相当于 Java 的 List<String>
}

注意

1、一个 Protobuf 文件里面可以添加多个消息类,也可以进行嵌套

2、上面的 1,2,3,4 并不是给字段赋值,而是给每个字段定义一个唯一的编号。这些编号用于二进制格式中标识你的字段,并且在使用你的消息类型后不应更改

3、1-15 的字段编号只占一个字节进行编码,16-2047 的字段编号占两个字节,包括字段编号和字段类型,因此建议更多的使用 1-15 的字段编号

4、可以指定最小字段编号为 1,最大字段编号为 2^29 - 1 或 536870911。另外不能使用 19000-19999 的标识号,因为 protobuf 协议实现对这些进行了预留,同样,也不能使用任何以前保留(reserved) 的字段编号

4.4、Protobuf 枚举类型

1
2
3
4
5
6
7
8
9
10
11
12
13
14
15
16
17
18
19
20
21
22
message Weather{
int32 query = 1;

//季节
enum Season{
//允许对枚举常量设置别名
option allow_alias = true;
//枚举里面的 = 操作是对常量进行赋值操作
//春
SPRING = 0;
//夏
SUMMER = 1;
//秋 如果不设置别名,不允许存在两个相同的值
FALL = 2;
AUTUMN = 2;
//冬
WINTER = 3;
}

//对 season 进行编号
Season season = 2;
}

1、定义枚举类型使用 enum 关键字

2、枚举类型第一个字段的值为必须 0,否则编译会报错

3、枚举常量值必须在 32 位整型值的范围内。因为 enum 值是使用可变编码方式的,对负数不够高效,因此不推荐在 enum 中使用负数

4、枚举里面的 = 操作是对常量进行赋值操作,而枚举外面的 = 则是对当前字段进行编号

4.5、Protobuf 集合

1
2
3
repeated string list = 1; //类似 Java 的 List<String>

map<string,string> = 2; //类似 Java 的 Map<String,String>

1、Protobuf 中定义集合,就是在你定义好的属性前面加 repeated 关键字

2、Protobuf 中定义 map 和 Java 类似,只不过 map 是小写的

4.6、reserved 保留字段

当我们使用 reserved 关键字指定一个字段编号或字段名为保留字段后,我们就不能去使用它,否则编译器会报错,如下:

image-20220824165406735

ok,简单的介绍了 Protobuf 语法后,接下来我们使用 AndroidStudio 将 Protobuf 文件转换为对应的 Java 文件来进行开发

五、Protobuf 转 Java 文件

首先我们要明白一点:Protobuf 是一种与平台,语言无关的数据存储格式,因此我们要在其它语言如:Java,Kotlin,Dart 等语言中使用它,则必须将 Protobuf 文件转换为对应平台的语言文件去使用,这里我们以转 Java 文件为例,介绍两种转换的方式:

1、集成 Protobuf 插件转换

2、使用 protoc 命令行转换

在使用这两种方式转换前,我们需要先集成 protobuf-java 这个第三方库,因为我们转换的 Java 文件中会使用这个库里面的功能

1
implementation 'com.google.protobuf:protobuf-java:3.19.2'

最新版本可查看此链接:https://github.com/protocolbuffers/protobuf/tree/main/java

5.1、集成 Protobuf 插件转换

插件链接:https://github.com/google/protobuf-gradle-plugin

1、在项目的根 build.gradle 文件中,添加如下依赖:

1
2
3
4
5
6
7
8
buildscript {
repositories {
gradlePluginPortal()
}
dependencies {
classpath 'com.google.protobuf:protobuf-gradle-plugin:0.8.19'
}
}

2、在 app 的 build.gradle 文件中应用插件

1
2
3
4
5
6
7
8
9
//1、如果使用的是 apply 方式,Android 插件必须在 Protobuf 插件之前,如下:
apply plugin: 'com.android.application'
apply plugin: 'com.google.protobuf'

//2、如果使用的是 Gradle DSL 方式,则与顺序无关
plugins {
id 'com.google.protobuf'
id 'com.android.application'
}

3、在 app 的 build.gradle 文件中配置 protobuf 编译任务

1
2
3
4
5
6
7
8
9
10
11
12
13
14
15
16
17
18
19
20
21
android {
//...
}

protobuf {
//配置 protoc 编译器
protoc {
artifact = 'com.google.protobuf:protoc:3.19.2'
}
//配置生成目录,编译后会在 build 的目录下生成对应的java文件
generateProtoTasks {
all().each { task ->
task.builtins {
remove java
}
task.builtins {
java {}
}
}
}
}

4、指定 protobuf 文件所在路径

1
2
3
4
5
6
7
8
9
10
11
12
android {
//...

sourceSets {
main {
//实际测试指不指定无所谓,不影响 Java 文件生成
proto {
srcDir 'src/main/proto'
}
}
}
}

经过上面 4 步,我们的插件就算配置完成了,接下来我们测试一下

5、重新编译项目

以我们上面那个 student.proto 为例,里面的内容如下:

1
2
3
4
5
6
7
8
9
10
11
12
13
14
15
16
17
18
19
20
21
22
23
24
25
26
27
28
29
30
31
32
33
34
35
36
37
38
39
//指定 Protobuf 版本
syntax = "proto3";

//指定包名
package erdai;

//定义一个学生的消息类
message Student{
//姓名
string name = 1;
//年龄
int32 age = 2;
//邮箱
string email = 3;
//课程
repeated string course = 4;

}

//定义一个天气的消息类
message Weather{
int32 query = 1;

//季节
enum Season{
option allow_alias = true;
//春
SPRING = 0;
//夏
SUMMER = 1;
//秋
FALL = 2;
AUTUMN = 2;
//冬
WINTER = 3;
}

Season season = 2;
}

编译后,会在 app/build/generated/source/proto/ 目录下生成如下文件:

image-20220824110842489

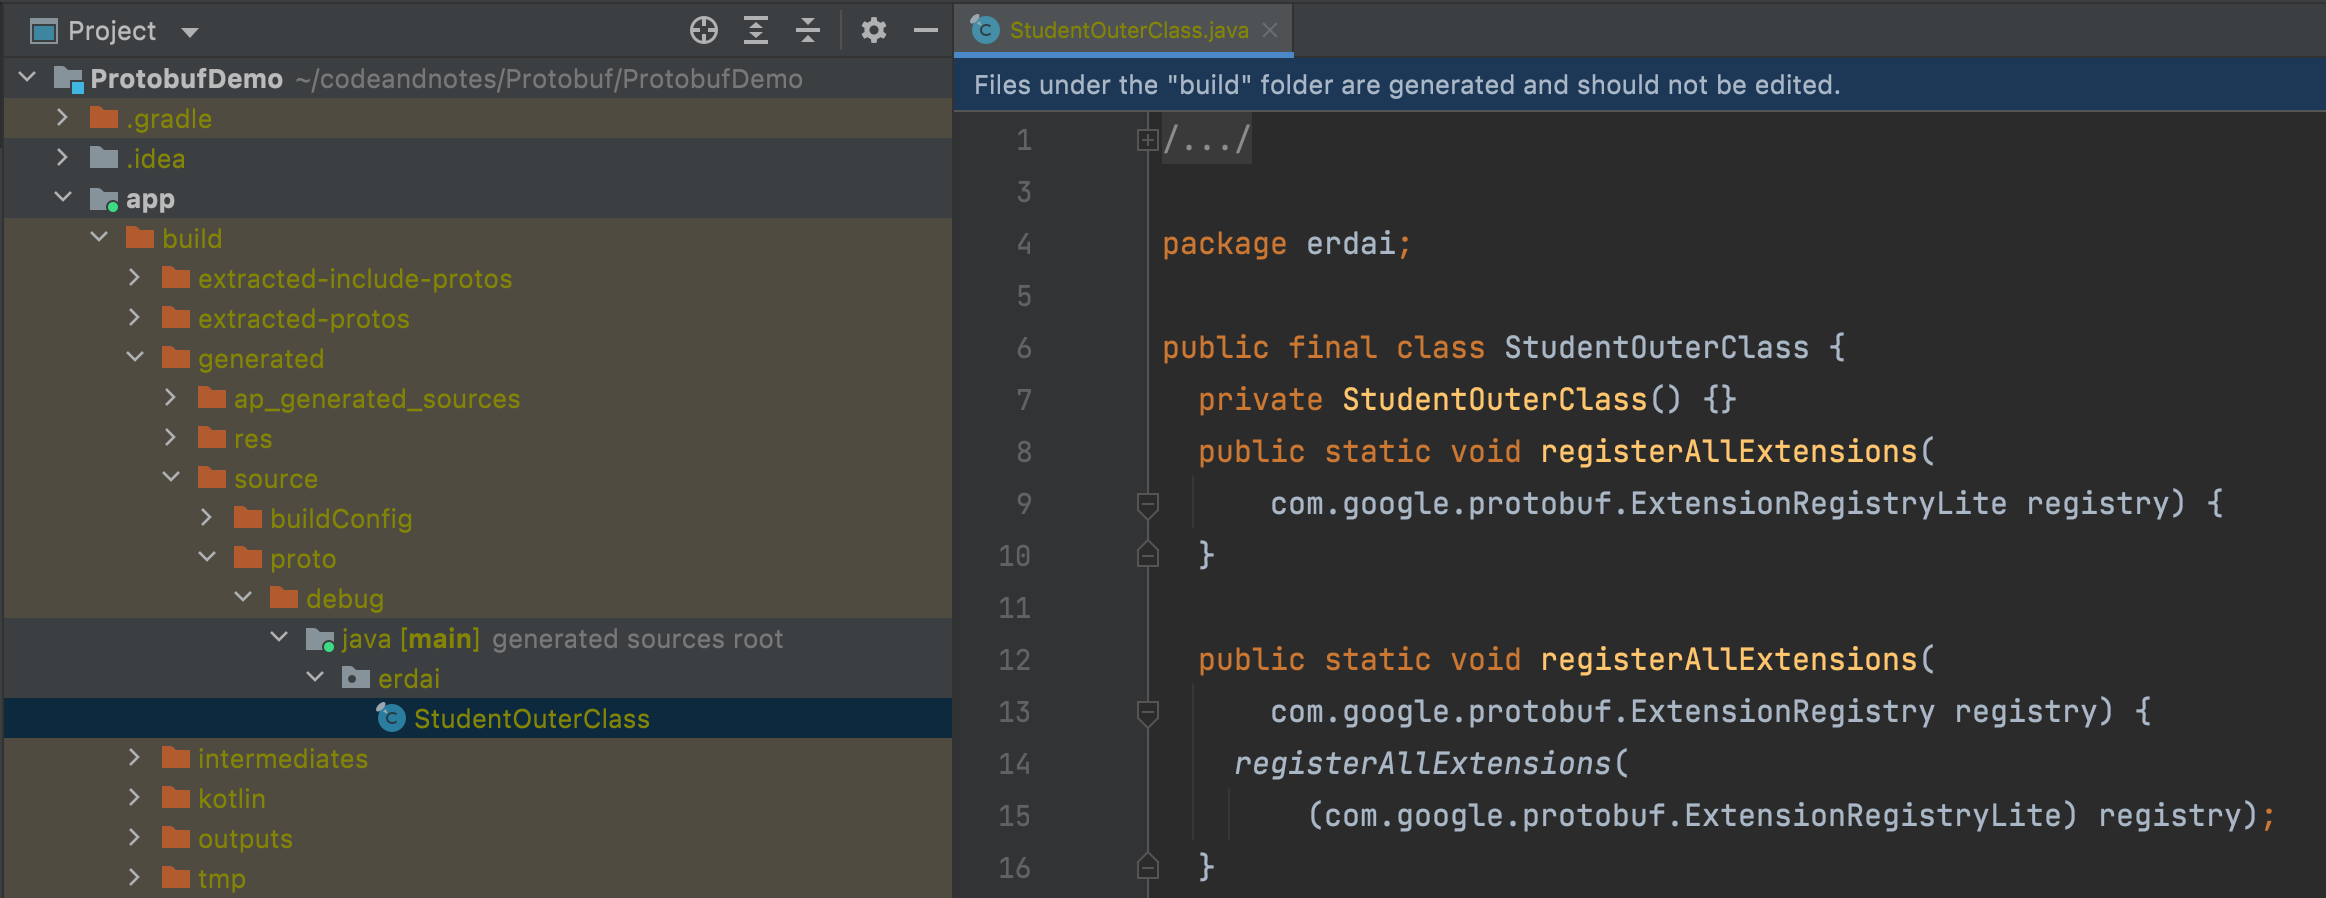
这种方式会自动给我们生成对应的 Java 类,就是集成的时候麻烦一点

5.2、使用 protoc 命令行转换

执行如下命令:

1
2
3
4
protoc --java_out=${"你要生成的 Java 文件目录"} ${"Protobuf 文件位置"}

//以我的为例:
protoc --java_out=./app/src/main/java ./app/src/main/proto/student.proto

生成的文件:

image-20220824112730091

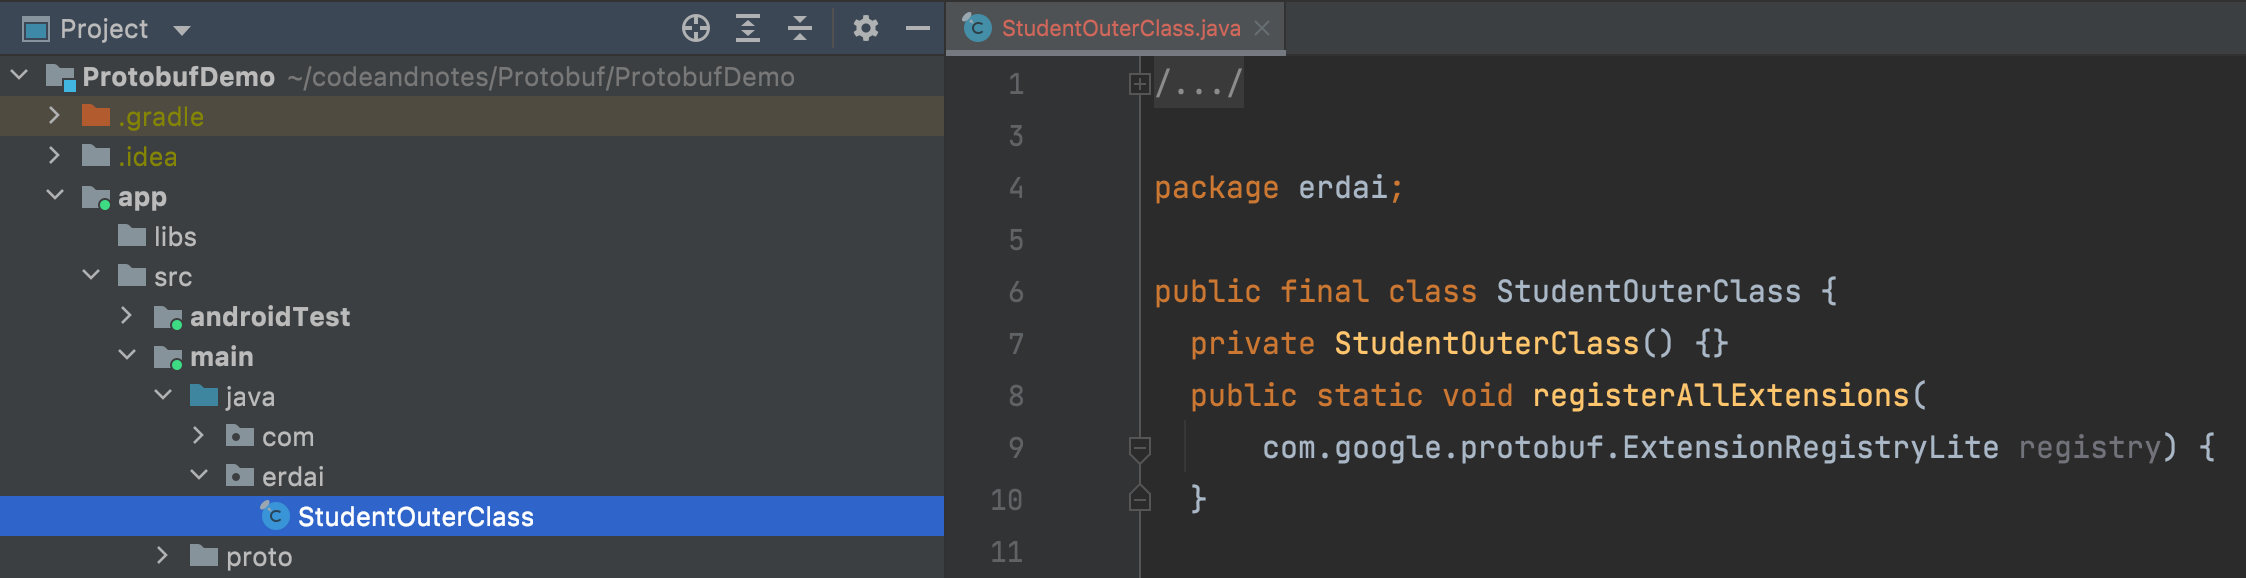
这种方式的优点是使用非常简单,但是每一次创建新的 Protobuf 文件都需要执行一下命令

5.3、生成的 Java 文件介绍

关于这个类的内容简单介绍下,大家也可以生成后自行看源码,如下图:

image-20220824143229899

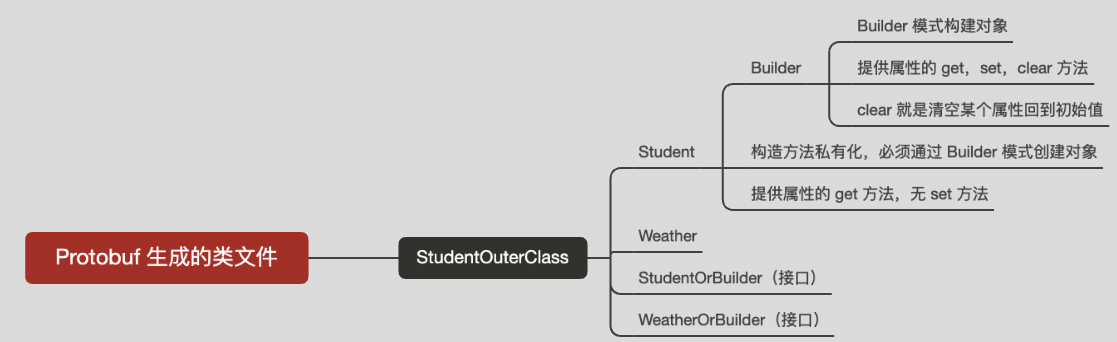
1、生成的类 StudentOuterClass 有 4 个子类:

Student (实现了 StudentOrBuilder 接口)

Weather (实现了 WeatherOrBuilder 接口)

StudentOrBuilder (接口)

WeatherOrBuilder (接口)

2、Student 是 StudentOuterClass 的静态内部类,构造方法私有化,需通过 Builder 模式创建对象。另外 Student 提供了属性的 get 方法,无 set 方法,Builder 作为 Student 的静态内部类提供了属性的 get,set,clear方法,clear 就是清空某个属性回到初始值

3、Weather 同 2

六、Protobuf 使用

接下来我们对刚才生成的 Java 类进行使用

6.1、基本调用

1
2
3
4
5
6
7
8
9
10
11
12
13
14
15
16
17
18
19
20
21
22
23
24
25
26
27
28
29
fun main(){
//构建 Protobuf 对象
val student = StudentOuterClass.Student.newBuilder()
.setName("erdai")
.setAge(18)
.setEmail("erdai666@qq.com")
.addAllCourse(mutableListOf("Math", "English", "Computer"))
.build()
println(student)
println()
println(StudentOuterClass.Weather.Season.SPRING.number)
println(StudentOuterClass.Weather.Season.SUMMER.number)
println(StudentOuterClass.Weather.Season.AUTUMN.number)
println(StudentOuterClass.Weather.Season.WINTER.number)
}

//打印结果
name: "erdai"
age: 18
email: "erdai666@qq.com"
course: "Math"
course: "English"
course: "Computer"


0
1
2
3

6.2、序列化和反序列化

1
2
3
4
5
6
7
8
9
10
11
12
13
fun main(){
//1、构建 Protobuf 对象
val student = StudentOuterClass.Student.newBuilder()
.setName("erdai")
.setAge(18)
.setEmail("erdai666@qq.com")
.addAllCourse(mutableListOf("Math", "English", "Computer"))
.build()
//2、序列化并返回一个包含其原始字节的字节数组
val byteArray: ByteArray = student.toByteArray()
//3、反序列化从字节数组中解析消息
val parseStudent: StudentOuterClass.Student = StudentOuterClass.Student.parseFrom(byteArray)
}

七、Protobuf 和 Json 相互转换

首先我们需要添加一个第三方依赖:

1
implementation 'com.google.protobuf:protobuf-java-util:3.19.2'

7.1、Protobuf 转 Json

1
2
3
4
5
6
7
8
9
10
11
12
13
14
15
16
17
18
19
20
21
fun main(){
//1、构建 Protobuf 对象
val student = StudentOuterClass.Student.newBuilder()
.setName("erdai")
.setAge(18)
.setEmail("erdai666@qq.com")
.addAllCourse(mutableListOf("Math", "English", "Computer"))
.build()
//2、Protobuf 转 Json
val json = JsonFormat.printer().print(student)
//3、打印 json
println(json)
}

//打印结果
{
"name": "erdai",
"age": 18,
"email": "erdai666@qq.com",
"course": ["Math", "English", "Computer"]
}

7.2、Json 转 Protobuf

1
2
3
4
5
6
7
8
9
10
11
12
13
14
15
16
17
18
19
20
21
22
23
24
fun main(){
//1、构建 Protobuf 对象
val student = StudentOuterClass.Student.newBuilder()
.setName("erdai")
.setAge(18)
.setEmail("erdai666@qq.com")
.addAllCourse(mutableListOf("Math", "English", "Computer"))
.build()
//2、Protobuf 对象转 Json
val json = JsonFormat.printer().print(student)
//3、Json 转 Protobuf 对象
val builder = StudentOuterClass.Student.newBuilder()
JsonFormat.parser().ignoringUnknownFields().merge(json,builder)
//4、打印 Protobuf 对象
println(builder.build())
}

//打印结果
name: "erdai"
age: 18
email: "erdai666@qq.com"
course: "Math"
course: "English"
course: "Computer"

八、Protobuf 和 Java 对象相互转换

这个实则是在七的基础上,当我们将 Protobuf 转换为 Json 后,在把 Json 转换为对应的 Java 对象,这里我们先引入 Gson :

1
implementation 'com.google.code.gson:gson:2.8.9'

定义一个接收当前 Json 的数据模型:

1
2
3
4
5
6
data class MyStudent(
var name: String? = "",
var age: Int = 0,
var email: String? = "",
var course: MutableList<String>? = null
)

最后进行转换:

1
2
3
4
5
6
7
8
9
10
11
12
13
14
15
16
17
18
fun main(){
//1、构建 Protobuf 对象
val student = StudentOuterClass.Student.newBuilder()
.setName("erdai")
.setAge(18)
.setEmail("erdai666@qq.com")
.addAllCourse(mutableListOf("Math", "English", "Computer"))
.build()
//2、将 Protobuf 转换为 Json
val json = JsonFormat.printer().print(student)

//3、将 Json 转换为 Java Bean 对象
val myStudent = Gson().fromJson(json,MyStudent::class.java)
println(myStudent)
}

//打印结果
MyStudent(name=erdai, age=18, email=erdai666@qq.com, course=[Math, English, Computer])

九、总结

关于 Protobuf 的开发流程:一般都是后台定义好 Protobuf ,然后给到我们客户端,客户端在根据 Protobuf 生成对应平台的代码进行使用即可。因此上面我讲的这些内容你掌握了,基本上能满足日常的开发

好了,本篇文章到这里就结束了,如果有啥问题,欢迎评论区一起交流

感谢你阅读这篇文章

参考和推荐

Protocol Buffers 官方文档

你的点赞,评论,是对我巨大的鼓励!

欢迎关注我的公众号: sweetying ,文章更新可第一时间收到

如果有问题,公众号内有加我微信的入口,在技术学习、个人成长的道路上,我们一起前进!


一篇就够系列:Android 中使用 Protobuf
https://sweetying520.github.io/2022/10/11/一篇就够系列:Android 中使用 Protobuf/
作者
sweetying
发布于
2022年10月11日
许可协议