
前言
很高兴遇见你~
这又是一个新的系列,灵感来源于最近做的一次布局优化,我们知道:Android 中少量的系统控件是通过 new 的方式创建出来的,而大部分控件如 androidx.appcompat.widget 下的控件,自定义控件,第三方控件等等,都是通过反射创建的。大量的反射创建多多少少会带来一些性能问题,因此我们需要去解决反射创建的问题,我的解决思路是:
1、通过编写 Android 插件获取 Xml 布局中的所有控件
2、拿到控件后,通过 APT 生成用 new 的方式创建 View 的类
3、最后通过反射获取当前类并在基类里面完成替换
一个小小的布局优化,涉及的东西还挺多的,Android 插件我们后续在讲,话说 Gradle 系列目前只更了一篇😂,别急,后面都会有的。我们这个系列主要是讲 APT,而讲 APT ,我们必须先了解两个重点知识:注解和反射
今天就重点来介绍下反射
Github Demo 地址 , 大家可以看 Demo 跟随我的思路一起分析
一、什么是反射?
简单来讲,反射就是:已知一个类,可以获取这个类的所有信息
一般情况下,根据面向对象封装原则,Java 实体类的属性都是私有的,我们不能获取类中的属性。但我们可以根据反射,获取私有变量、方法、构造方法,注解,泛型等等,非常的强大
注意:Google 在 Android 9.0 及之后对反射做了限制,被使用 @hide 标记的属性和方法通过反射拿不到
二、反射使用
下面给出一段已知的代码,我们通过实践来对反射进行讲解:
1
2
3
4
5
6
7
8
9
10
11
12
13
14
15
16
17
18
19
20
21
22
23
24
25
26
27
28
29
30
31
32
33
34
35
36
37
38
39
40
41
42
43
44
45
46
47
48
49
50
51
52
53
54
55
56
57
58
59
60
61
62
63
64
65
66
67
68
69
70
|
package com.dream.aptdemo;
@Target(ElementType.TYPE)
@Retention(RetentionPolicy.RUNTIME)
@interface CustomAnnotation1{
}
@Target(ElementType.TYPE)
@Retention(RetentionPolicy.RUNTIME)
@interface CustomAnnotation2{
}
@Target(ElementType.TYPE)
@Inherited
@Retention(RetentionPolicy.RUNTIME)
@interface CustomAnnotation3{
}
interface ICar {
void combine();
}
@CustomAnnotation3
class Car<K,V> {
private String carDesign = "设计稿";
public String engine = "发动机";
public void run(long kilometer) {
System.out.println("Car run " + kilometer + " km");
}
}
@CustomAnnotation1
@CustomAnnotation2
class Benz extends Car<String,Integer> implements ICar {
private String carName = "奔驰";
public String carColor = "白色";
public Benz() {
}
private Benz(String carName) {
this.carName = carName;
}
public Benz(String carName, String carColor) {
this.carName = carName;
this.carColor = carColor;
}
@Override
public void combine() {
System.out.println("组装一台奔驰");
}
private void privateMethod(String params){
System.out.println("我是私有方法: " + params);
}
}
|
下面所讲到的都是关于反射一些常用的 Api
三、类
我们可以通过 3 种方式去获取类对象:
1)、Benz.class :类获取
2)、benz.getClass :对象获取
3)、Class.forName :静态获取
1
2
3
4
| Benz benz = new Benz();
Class benzClass = Benz.class;
Class benzClass1 = benz.getClass();
Class benzClass2 = Class.forName("com.dream.aptdemo.Benz");
|
注意:
1、在一个 JVM 中,一种类,只会有一个类对象存在。所以以上三种方式取出来的类对象,都是一样的。
2、无论哪种途径获取类对象,都会导致静态属性被初始化,而且只会执行一次。(除了直接使用 Benz.class 类获取这种方式,这种方式不会导致静态属性被初始化)
下面的流程会经常使用到 benz 实例和 benzClass 类对象
4)、获取类名
1
2
3
4
5
| String className = benzClass.getSimpleName();
System.out.println(className);
Benz
|
5)、获取类路径
1
2
3
4
5
6
7
| String classPath1 = benzClass.getName();
String classPath2 = benzClass.getCanonicalName();
System.out.println(classPath1);
System.out.println(classPath2);
com.dream.aptdemo.Benz
com.dream.aptdemo.Benz
|
这里可能大家会有个疑问:benzClass.getName() 和 benzClass.getCanonicalName() 有啥区别吗?
从上面打印结果来看,没啥区别,但是如果我们在 Benz 这个里面加个内部类,然后获取内部类的路径,你就会看到区别了:
1
2
3
4
5
6
7
8
9
10
11
12
13
14
|
class Benz extends Car implements ICar {
class InnerClass{
}
}
Class<Benz.InnerClass> innerClass = Benz.InnerClass.class;
System.out.println(innerClass.getName());
System.out.println(innerClass.getCanonicalName());
com.dream.aptdemo.Benz$InnerClass
com.dream.aptdemo.Benz.InnerClass
|
看到区别了吧,因此我们可以得到结论:在正常情况下,getCanonicalName和 getName 获取到的都是包含路径的类名。但内部类有点特殊,getName 获取的是路径.类名$内部类
6)、获取父类名
1
2
3
4
| String fatherClassName = benzClass.getSuperclass().getSimpleName();
System.out.println(fatherClassName);
Car
|
7)、获取接口
1
2
3
4
5
6
| Class[] interfaces = benzClass.getInterfaces();
for (Class anInterface : interfaces) {
System.out.println(anInterface.getName());
}
com.dream.aptdemo.ICar
|
8)、创建实例对象
1
2
3
4
5
6
7
8
9
10
11
|
Constructor constructor = benzClass.getDeclaredConstructor();
Benz myBenz = (Benz) constructor.newInstance();
myBenz.carColor = "黑色";
myBenz.combine();
System.out.println(myBenz.carColor);
组装一台奔驰
黑色
|
注意:下面要讲的关于带 Declare 的属性和方法和不带Declare 区别:
1、带 Declare 的属性和方法获取的是本类所有的属性和方法,不包含继承得来的
2、不带 Declare 的属性和方法获取的是所有 public 修饰的属性和方法,包含继承得来的
3、访问 private 修饰的属性和方法,需调用 setAccessible 设置为 true ,表示允许我们访问私有变量
四、属性
1)、获取单个属性
1
| Field carName = benzClass.getDeclaredField("carName");
|
2)、获取多个属性
1
2
3
4
5
6
7
8
9
10
11
12
13
14
15
16
17
|
Field[] declaredFields = benzClass.getDeclaredFields();
for (Field declaredField : declaredFields) {
System.out.println("属性: " + declaredField.getName());
}
属性: carName
属性: carColor
Field[] fields = benzClass.getFields();
for (Field field : fields) {
System.out.println("属性: " + field.getName());
}
属性: carColor
属性: engine
|
3)、设置允许访问私有变量
1
| carName.setAccessible(true);
|
4)、获取属性名
1
2
3
| System.out.println(carName.getName());
carName
|
5)、获取变量类型
1
2
3
| System.out.println(carName.getType().getName());
java.lang.String
|
6)、获取对象中该属性的值
1
2
3
| System.out.println(carName.get(benz));
奔驰
|
7)、给属性设置值
1
2
3
4
| carName.set(benz,"sweetying");
System.out.println(carName.get(benz));
sweetying
|
五、方法
1)、获取单个方法
1
2
3
4
5
|
Method publicMethod = benzClass.getMethod("combine");
Method privateMethod = benzClass.getDeclaredMethod("privateMethod",String.class);
|
2)、获取多个方法
1
2
3
4
5
6
7
8
9
10
11
12
13
14
15
16
17
18
19
20
21
22
23
24
25
26
27
|
Method[] declaredMethods = benzClass.getDeclaredMethods();
for (Method declaredMethod : declaredMethods) {
System.out.println("方法名: " + declaredMethod.getName());
}
方法名: privateMethod
方法名: combine
Method[] methods = benzClass.getMethods();
for (Method method : methods) {
System.out.println("方法名: " + method.getName());
}
方法名: combine
方法名: run
方法名: wait
方法名: wait
方法名: wait
方法名: equals
方法名: toString
方法名: hashCode
方法名: getClass
方法名: notify
方法名: notifyAll
|
3)、方法调用
1
2
3
4
5
| Method privateMethod = benzClass.getDeclaredMethod("privateMethod",String.class);
privateMethod.setAccessible(true);
privateMethod.invoke(benz,"接收传入的参数");
我是私有方法: 接收传入的参数
|
六、构造方法
1)、获取单个构造方法
1
2
3
4
5
|
Constructor declaredConstructor = benzClass.getDeclaredConstructor(String.class);
Constructor singleConstructor = benzClass.getConstructor(String.class,String.class);
|
2)、获取多个构造方法
1
2
3
4
5
6
7
8
9
10
11
12
13
14
15
16
17
18
19
|
Constructor[] declaredConstructors = benzClass.getDeclaredConstructors();
for (Constructor declaredConstructor1 : declaredConstructors) {
System.out.println("构造方法: " + declaredConstructor1);
}
构造方法: public com.dream.aptdemo.Benz()
构造方法: public com.dream.aptdemo.Benz(java.lang.String,java.lang.String)
构造方法: private com.dream.aptdemo.Benz(java.lang.String)
Constructor[] constructors = benzClass.getConstructors();
for (Constructor constructor1 : constructors) {
System.out.println("构造方法: " + constructor1);
}
构造方法: public com.dream.aptdemo.Benz()
构造方法: public com.dream.aptdemo.Benz(java.lang.String,java.lang.String)
|
3)、构造方法实例化对象
1
2
3
4
5
6
7
8
9
10
11
12
|
declaredConstructor.setAccessible(true);
Benz declareBenz = (Benz) declaredConstructor.newInstance("");
System.out.println(declareBenz.carColor);
白色
Benz singleBenz = (Benz) singleConstructor.newInstance("奔驰 S ","香槟金");
System.out.println(singleBenz.carColor);
香槟金
|
七、泛型
1)、获取父类的泛型
1
2
3
4
5
6
7
8
9
10
| Type genericType = benzClass.getGenericSuperclass();
if (genericType instanceof ParameterizedType) {
Type[] actualType = ((ParameterizedType) genericType).getActualTypeArguments();
for (Type type : actualType) {
System.out.println(type.getTypeName());
}
}
java.lang.String
java.lang.Integer
|
八、注解
1)、获取单个注解
1
2
3
4
5
6
7
8
9
10
11
12
13
14
|
Annotation annotation1 = benzClass.getAnnotation(CustomAnnotation1.class);
System.out.println(annotation1.annotationType().getSimpleName());
Annotation annotation3 = benzClass.getAnnotation(CustomAnnotation3.class);
System.out.println(annotation3.annotationType().getSimpleName());
CustomAnnotation1
CustomAnnotation3
Annotation declaredAnnotation1 = benzClass.getDeclaredAnnotation(CustomAnnotation2.class);
System.out.println(declaredAnnotation1.annotationType().getSimpleName());
CustomAnnotation2
|
2)、获取全部注解
1
2
3
4
5
6
7
8
9
10
11
12
13
14
15
16
17
18
|
Annotation[] annotations = benzClass.getAnnotations();
for (Annotation annotation : annotations) {
System.out.println("注解名称: " + annotation.annotationType().getSimpleName());
}
注解名称: CustomAnnotation3
注解名称: CustomAnnotation1
注解名称: CustomAnnotation2
Annotation[] declaredAnnotations = benzClass.getDeclaredAnnotations();
for (Annotation declaredAnnotation : declaredAnnotations) {
System.out.println("注解名称: " + declaredAnnotation.annotationType().getSimpleName());
}
注解名称: CustomAnnotation1
注解名称: CustomAnnotation2
|
通过上面的讲解,我们把反射大部分知识点都讲完了,可以说反射是非常的强大,但是学习了之后,你可能会不知道该如何使用,反而觉得还不如直接调用方法来的直接和方便,下面我们通过实践来感受一下。
九、反射实践
需求大概就是:通过后台配置下发,完成 App 业务功能的切换。因为只是模拟,我们这里就以通过读取本地配置文件完成 App 业务功能的切换:
1)、首先准备两个业务类,假设他们的功能都很复杂
1
2
3
4
5
6
7
8
9
10
11
12
13
14
15
16
17
18
|
package com.dream.aptdemo;
class Business1 {
public void doBusiness1Function(){
System.out.println("复杂业务功能1");
}
}
class Business2 {
public void doBusiness2Function(){
System.out.println("复杂业务功能2");
}
}
|
2)、非反射方式
1
2
3
4
5
6
7
8
| public class Client {
@Test
public void test() {
new Business1().doBusiness1Function();
}
}
|
假设这个时候需要从第一个业务功能切换到第二个业务功能,使用非反射方式,必须修改代码,并且重新编译运行,才可以达到效果。那么我们可以通过反射去通过读取配置从而完成功能的切换,这样我们就不需要修改代码且代码变得更加通用
3)、反射方式
1、首先准备一个配置文件,如下图:
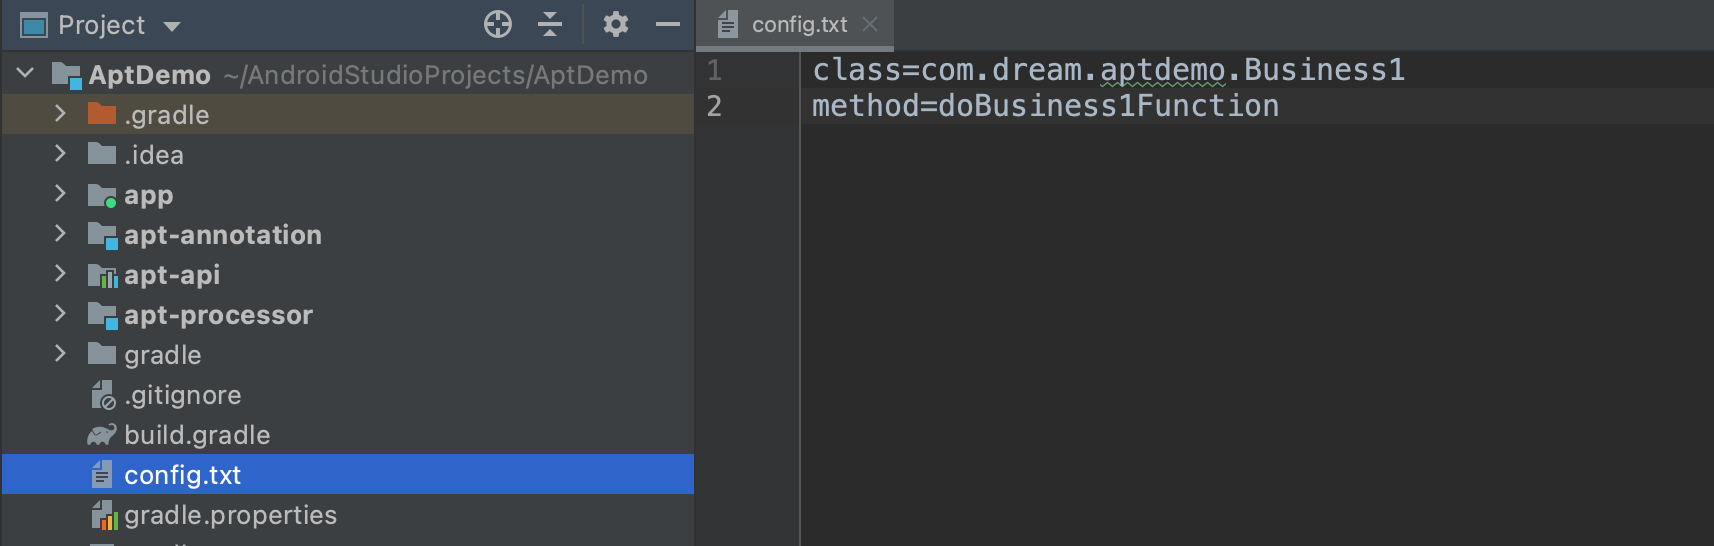
2、读取配置文件,反射创建实例并调用方法
1
2
3
4
5
6
7
8
9
10
11
12
13
14
15
16
17
18
19
20
21
22
23
24
25
26
| public class Client {
@Test
public void test() throws Exception {
try {
File springConfigFile = new File("/Users/zhouying/AndroidStudioProjects/AptDemo/config.txt");
Properties config= new Properties();
config.load(new FileInputStream(springConfigFile));
String classPath = (String) config.get("class");
String methodName = (String) config.get("method");
Class aClass = Class.forName(classPath);
Constructor declaredConstructor = aClass.getDeclaredConstructor();
Object o = declaredConstructor.newInstance();
Method declaredMethod = aClass.getDeclaredMethod(methodName);
declaredMethod.invoke(o);
} catch (Exception e) {
e.printStackTrace();
}
}
}
|
3、完成上面两步后,后续我们就只需要修改配置文件就能完成 App 业务功能的切换了
十、总结
本篇文章讲的一些重点内容:
1、反射常用 Api 的使用,注意在访问私有属性和方法时,调用 setAccessible 设置为 true ,表示允许我们访问私有变量
2、实践通过反射完成 App 业务功能的切换
好了,本篇文章到这里就结束了,希望能给你带来帮助 🤝
感谢你阅读这篇文章
下篇预告
下篇文章我会讲注解,敬请期待吧
参考和推荐
Java反射有多强? 他拥有这五大神奇功能!
HOW2J 反射部分
你的点赞,评论,是对我巨大的鼓励!
欢迎关注我的公众号: sweetying ,文章更新可第一时间收到
如果有问题,公众号内有加我微信的入口,在技术学习、个人成长的道路上,我们一起前进!